YOUR UK GUIDE TO GROWING APPLE TREES
By David Marks
Buying an apple tree is an investment in the future. It won’t produce anything for at least two years and maybe will take up to four years to bear fruit but after that time it will give you a crop for thirty or forty years with very little maintenance.
Time taken to chose the correct location and variety, plant it properly and prune it once a year will give you years of delicious, free fruit. Our guide takes you through this process in plain English backed up with expert advice.
CHOOSING THE BEST APPLE TREE FOR YOU
The key factors you need to consider before buying your apple tree are:
- Tree size and rootstock – this will depend on the space you have available and how accessible you want the fruit to be. The rootstock (see below) is significantly responsible for the size of your apple tree.
- Type – cooking or dessert apple.
- Variety – this is a personal choice but we can guide you as far as sweetness and texture is concerned.
- Cost – bare rooted apple trees are normally cheaper compared to container grown ones but they are only available at specific times of the year.
- Keeping qualities – different types and varieties can last from as short as a week or two right up to five months.
- Pollination – many apple trees require another nearby apple tree if they are to bear fruit and in some circumstances you need to choose wisely to ensure the blossom will be pollinated.
- Weather conditions and position – apple trees are fully hardy in the UK however some weather conditions and positions may damage the blossom and / or prevent insect from doing their job at pollination. Some varieties are better at withstanding adverse weather conditions compared to others.
None of the above is complicated, especially easy with our advice, but you do need to consider each point if you are to get the best crop from your apple tree. Our full list of apple tree varieties is in the box below.
APPLE TREE SIZE AND ROOTSTOCKS EXPLAINED
If you grow an apple tree from a pip it will have two characteristics which will almost be guaranteed. The first is that it will not be the same variety of apple, almost certainly it will be a mixture of two varieties. The second characteristic will be the overall size of the tree, it will be far too tall and wide for the average garden. These are two reasons why growing apple trees from pips is not the best idea.
Rootstocks may sound a bit complicated but when you buy your apple tree they are a key factor. The rootstock is a major factor in determining the size and vigour of the tree as well as the variety you choose. At the end of this section we suggest a couple of rootstocks to make your choice simpler although understanding how a modern apple tree is formed is useful knowledge.
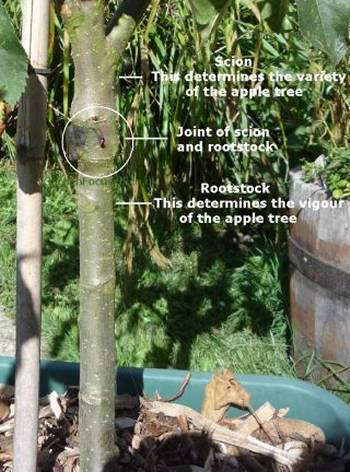
All apple trees sold in the UK nowadays are formed from two parts. The lower part is called the rootstock and the upper part is called the scion; the two are joined together at the plant nursery from two different apple tree varieties.
If you look at the picture on the right or below (click it to enlarge it and see far more clearly) you can see a “bump” in the trunk which is where the top scion and the bottom rootstock have been joined together. This is present on all nursery grown apple trees and appears below the lowest branch.
Apple trees are grown on many rootstocks in the UK but in reality only four are suitable for most conditions. The following paragraphs summarise the four most currently common one and their uses.
M27 ROOTSTOCK
This produces the least vigorous and smallest of apple trees and is suitable for growing a manageable sized tree in a container. This rootstock is only suitable for normal open garden use when it can be watered and fed regularly and the soil is not too light. The tree will need to be permanently staked.
M9 ROOTSTOCK
Also suitable for growing in containers and ideal for small gardens. The tree will grow to about 2.4m / 8ft high and will need to be permanently staked.
M26 ROOTSTOCK
This rootstock will grow a tree with a fully grown height and spread of 3m / 10ft. It is ideal for a large container grown tree and for small gardens. More vigorous than the two above and better able to cope with lack of water. This also requires permanent staking in windy conditions for some varieties.
M26 is often used as the rootstock of choice for more vigorously growing varieties such as the Bramley’s Seedling where it will not require staking.
MM106 ROOTSTOCK
Suitable for medium and larger sized gardens it has a fully grown height and width of about 4m / 13ft. Regular pruning can reduce the overall height and spread by about a quarter.
ROOTSTOCKS AND WOOLLY APHIDS
Woolly aphids are common in some parts of the UK and if you want to minimise the likelihood and effect of this pest then rootstock choice is important. In general the more vigorous the rootstock the more resistant it is to woolly aphid attack. Of the rootstocks name above, MM106 is by far the most resistant.
TYPES OF APPLE
There are two types of apples, cooking ones and eating ones. Cooking apples have less sugar content with a tarter taste which is not to many people’s taste unless cooked with sugar. Cooking apples also tend to be larger compared to eating apples. If you plan to have two apple trees in your garden or allotment then one cooker and one eater is a good solution.
Much is made about using the correct apples for cooking but in reality many eating apples cook very well. All they require is slightly less sugar added.
Sometimes however, with cooking apples, it is important to the recipe if the apple cooks to a puree or if it retains much of its shape. For example, apple sauce requires an apple which cooks to a puree and a Bramleys Seedling is ideal for this. On the other hand an apple tart with the apple segments displayed on the top requires a cooking apple which retains its shape and Annie Elizabeth is a good choice for this type of recipe. Cooking with apples is a matter of personal preference and for some recipes such as apple pie, either of the above varieties may be your preference.
BARE-ROOTED OR CONTAINER GROWN
Bare-rooted apple trees are grown in open ground at nurseries and when the time comes to sell them they are dug up with very minimal soil on the roots and shipped to the customer or garden centre with a bag over the roots to maintain moisture levels.
This may sound drastic but there are factors which make this good practice. The first is that the digging up only occurs when the apple tree is dormant – typically between late November to early March although weather conditions can extend or reduce this time frame. For this reason you will only be able buy bare-rooted apple trees during late autumn to very early spring.
If the trees were dug up in summer when not dormant the heat and their need for water would soon kill them. Bare rooted trees, as is the case with container grown ones, need the correct conditions for planting. If these are not present when the tree is delivered a simple technique called heeling-in can be used to store them outside for a month or two with absolutely no damage to the tree. See our section on planting apple trees for more information.
Container grown apple trees are exactly what it says on the pack, they are grown in a container and not in the open ground. These trees are available all year round and can be kept in their original containers for a couple of weeks before planting if required.
Our opinion on which is best is clear, buy bare-rooted trees in preference to container grown ones even if you plan to grow the tree in a container at home. The key reason for this is cost; container grown apple trees cost more compared to to bare-rooted trees because the postage for container grown plants is often much higher compared to bare-rooted trees, an important point if you are buying online.
Aside from postage costs there is very little to choose between bare-rooted trees and container grown ones. Nowadays the choice of postal delivery companies and couriers is increasing rapidly and the cost of postage is changing all the time sometimes for good and sometimes for bad, so keep a close eye on them when placing an order.
VARIETIES OF APPLE TREE
When choosing an apple tree variety you need first to decide if you want a cooking or an eating apple (see above). Once that decision has been made then the rest, assuming you have read through the article above, is down to your own particular taste buds and other requirements.
The list of varieties below spans several tastes and keeping qualities, they are a few of our own favourites though, the choice is really up to you. We have stuck to varieties that easily available from garden centres and online, more exotic choices can be made if you search through local plant nurseries. At the end we have also listed a couple of named apples which are very popular (in the supermarkets only in some cases) but have some significant drawbacks which the amateur might not be aware of.
VARIETIES OF APPLE TREE RECOMMENDED FOR AMATEURS
BRAMLEY’S SEEDLING
If you want a cooking apple which produces a delicious tasting puree then a Bramley is for you. The tree is very vigorous and produces lots of very large cooking apples. This is a triploid variety with very attractive flowers. Click here for more information about Bramley apple trees.
DISCOVERY
One of the earliest of all the apple trees producing fruit in August. The apples are crisp with a bright red ruby skin. Click here for full details of the Discovery apple tree.
EGREMONT RUSSET
Different from most modern apples, Egremont Russet dates back to 1872. In our opinion it is the best of the russet apple trees (click here for more about russet apple trees) with a delicious nutty flavour of a bygone age. Click here for detailed information on the Egremont Russet apple tree.
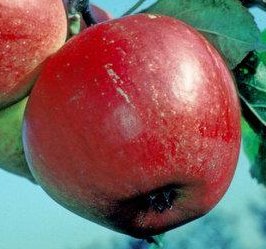
FALSTAFF
Falstaff is one of the heaviest cropping of all eating apple trees and it does this regularly year after year. Introduced in 1971, it produced a sport (a natural mutation) in 1983 which shares exactly the same characteristics with the exception that Red Falstaff has a more red skin.
Crunchy, acidic and sweet, it is one of the best eating apples for a UK garden. Click here for our full description of the Falstaff and Red Falstaff apple varieties.
Falstaff apple
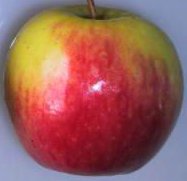
FIESTA
Fiesta is a cross between Idared and Cox’s Orange Pippin and it takes the best qualities of both varieties whilst at the same time avoiding most of their not-so-good characteristics.
Superb taste, keeps very well, ideal for eating first but also excellent for cooking. Good disease resistance. Click here for our full description of the Fiesta apple variety.
Fiesta apple
SUNSET
We very strongly recommend this apple variety for any size of garden in the UK. For smaller gardens and container growing we think it’s possibly the best variety ever.
It has all the flavour of a Cox’s Orange Pippin but almost none of the pest and disease problems. If you want a relatively compact apple tree which very reliably crops each year with the minimum of attention then Sunset has to be number one on your list. Click here for our full description of the Sunset apple variety.
BE WARY OF THESE APPLE TREE VARIETIES!
The apple trees mentioned below are ones which we do not recommend growing in the UK even though they are firm favourites at the supermarkets.
BRAEBURN
Very popular in the supermarkets but Braeburn needs too much sunshine to be a sensible
proposition for many parts of the UK.
PINK LADY
Not really a variety of apple tree, rather it is a brand based on the variety Cripps Pink. It takes far too long to mature for UK weather where there is neither the required warmth nor the sun for much of the year. Click here for our full description of the Pink Lady brand and the Cripps Pink variety.
JAZZ
Again, this is the sales name of an apple not a variety. Its real name is Scifresh and the
apple trees are not available for sale to the amateur gardener.
POLLINATION OF APPLE TREES
Pollination is the process by which apple trees (and other plants) produce seeds and fruit. Within the flower of an apple tree is the anther, which has pollen over its surface, and the stigma. Pollination occurs by bees (and some other insects) moving over the anther, collecting pollen and then transferring it to the stigma of the same or another flower. It all sounds complicated and even more convoluted when you consider that bees fly for several miles and the pollination process occurs naturally and easily between apple trees wide distances apart.
Most apple trees need to be pollinated by another apple tree of a different variety. To do this both apple trees need to be in blossom at the same time. A few apple trees such as Braeburn, Granny Smith and Fiesta are partially or fully self-fertile. This means that they do not require another apple tree for pollination although they may benefit from another suitable variety.
A few apple trees are triploid (they are both self-sterile and cannot pollinate other apple trees). Although many growers of apple trees make a great fuss about pollination partners, in most cases nearby (i.e. 200 to 300 metres) apple trees in gardens and parks almost always do the job fine. Even in the countryside, crab apples growing wild make ideal pollination partners. But if you have any doubt then consult our page on apple tree pollination with our easy to use interactive pollination partners selector. That page contains everything you ever wanted know about apple tree pollination.
Rootstocks and Size
Guide to Planting
Care Plan
Pruning Apple Trees
Harvest and Storage
Pests and Disease
Pollination Groups