CALENDAR FOR GROWING SQUASH AND PUMPKINS
Sow Squash seeds indoors – the third week of April (UK average)
Plant out Squash - the first week of June (UK average)
Keep squash well watered - the third week of June (UK average) onwards
Monthly feed with liquid tomato fertiliser - the last week of June (UK average) onwards
Begin to harvest Squash - the second week of October
WHERE TO GROW SQUASH AND PUMPKINS
Squash originate from South America and so do best in a warm position. It's also essential to keep the soil moist if you want the best crop. The very best conditions for growing squash are;
- Full sun
- Moderately heavy soil such as clay which also drains well
- Neutral to slightly alkaline soil (pH
level of 6.5), but squash are not picky about this
- Squash do not need to be part of a crop rotation plan however it's advisable to move them around every two or three years.
WHEN AND HOW TO SOW SQUASH SEED
Squash do best in warm soil and in the UK it is best sow seed in pots indoors to get them off to a good start. You have two options, sow them in seed tray modules and then transplant them to 8cm / 3in pots as soon as the roots appear out of the base of the modules.
The second option, the one we prefer, is to sow the seeds directly into 10cm / 4in pots. The advantage of this is less root disturbance and, just as important, you will know right from the start how much space is required. It is often the case that when inexperienced gardeners sow in modules, they are then surprised at just how much space is needed when potting up into 8cm / 3in pots.
Either way, sow the seeds in the third week of April (UK average) . Make a small hole in the compost (ordinary multi-purpose compost is fine) about 1.5cm / 1/2in deep. Place the seed in it with the end where the root will emerge pointing downwards (see picture below). Cover with compost and lightly firm down the compost over the seed. When sowing in modules, sow one seed per module. When sowing in 8cm / 3in pots, sow two seeds per pot.
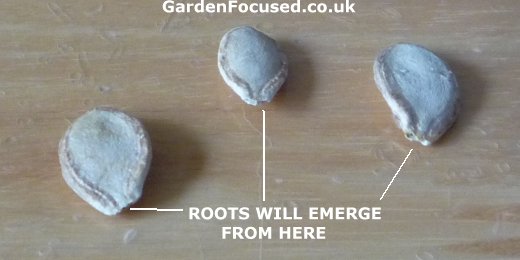
![]()
Place the pots / modules in a tray of water so that they are watered from below. Now the important part! Squash will only germinate in warm soil so we suggest a position where the soil reaches about 21C / 70F. This is about the temperature in the average centrally heated house. The will germinate even quicker if the soil is warmer (up to 30C / 85F), for example near (but not on) a radiator. Germination normally takes about 5 to 10 days.
PLANTING SQUASH OUTSIDE
For the very best crops prepare the planting area at the same time as you sow the seeds indoors. To do this, dig out a hole about 45cm / 18in wide and high and fill about a third of the hole with well-rotted garden compost or multi-purpose compost.
Overfill the hole with some of the dug out soil and mix it in to the compost with a trowel. Aim to have a mound of soil above the dug out area about 15cm / 6in high. This will settle slightly by the time you plants are planted out but it will still provide a very free draining area, just what squash prefer.
Harden off for the plants a week or so before transplanting. Do this by placing them outdoors in a protected position during the day but taking them back in at night. Never let plants remain outside when there is any chance of a frost.
Before transplanting, scatter a couple of handfuls per plant of fish, blood and bone onto the planting area. As a guide in your area, the plants can be planted outside in the first week of June (UK average) but never plant them out if a frost or cold weather is predicted.
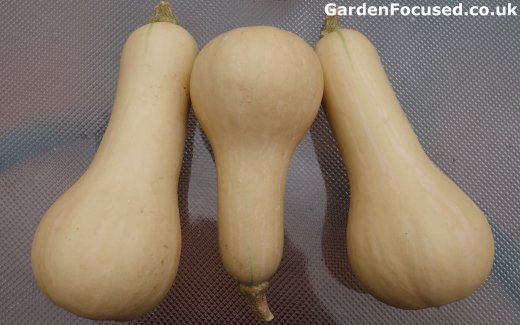
![]()
Hunter variety of butternut squash
When transplanting try to avoid disturbing the roots as much as possible. Plant in the open ground to the same depth as the plants were when in their pots. Planting distances vary greatly depending on the variety. Compact varieties will require only 1m / 3ft between plants, the more sprawling varieties require up to 2.5m / 8ft between plants. Check the seed packet for specific details. Water well.
Ideally, mulch around the plants to a depth of 5cm / 2in. This will keep the soil warm, prevent water loss, suppress weed competition and provide a small supply of additional nutrients over a long period of time.
When the plants are young slugs and snails can often be a problem. Don't be fooled by the hairy leaves, the slugs and snails are not bothered by these. Slug pellets or your chosen method of repelling slugs will often be needed. As the plants grow, slugs and snails will gradually become less of a problem.
GROWING SQUASH IN CONTAINERS
Squash and pumpkins are ideal for growing in containers. If growing in a container it should be at least 45cm / 18in wide. Larger containers are even better because they will not need to be watered so frequently. Ensure that all containers have water drainage holes in the base. Mulch the top of the container to reduce water loss from evaporation
They can also be grown in grow bags, preferably one plant per grow bag. Feeding and care of squash / pumpkins is the same as if they were grown in the open, however watering will be required much more frequently to keep the compost moist at all times but not waterlogged.
CARING FOR SQUASH
Keeping the plants moist and weed free are the main care needs of squash and pumpkins. The tasks below will also help you to achieve the best crops:
- Remove any yellowing leaves.
- Water well when conditions are dry.
- Weeding will be required initially but the plants will quickly grow
large enough to smother all but the most determined weeds.
- To stop the plants from spreading over too wide an area it's
possible to train the stems to grow in ever increasing circles. Simply
use wooden pegs to train the plants where you want them to grow.
- If you are happy with small sized crops then let the plants grow as
they want. If you want larger sized crops, often popular with pumpkins,
then cut off the stems when they reach 60cm / 2ft long. Reducing the
amount of pumpkins per plant to two or three will also give you larger pumpkins.
- When the squash fruits begin to form, remove any leaves which cover the fruits to expose them to as much sunshine as possible.
SUPPORTING SQUASH AND PUMPKINS
If squash are left to rest on the ground as they grow there is the very real chance that they will rot. For smaller squashes it is simple to erect a support for them to grow over in order to keep the fruit off the ground. A very simple solution is wire mesh arched over some wooden supports although some gardeners go to great lengths to erect vertical supports which look very attractive.
In our experience, supporting larger squash and pumpkins requires a good deal of effort because individual fruit is so heavy. In this case let the plants grow over the ground without support. Each fruit can be placed on a tile, seed tray or whatever else you have to hand.
WHEN AND HOW TO HARVEST YOUR SQUASH
As a guide, your squash and pumpkins should be ready to harvest in the second week of October. However, the fruits are frost tender so keep an eye on the weather forecast and always harvest before the first frost.
If possible, harvest on a dry day cutting the stalk as far away from the fruit as possible. Squash can store for two to three months if they are “cured”. This involves leaving them in the sunshine, or, if there is no sunshine bring them indoors and cure them on a sunny windowsill. Do this for for or five days.
Then store them in a cool, dark position, 10C to 12C is ideal until you want to eat them.
PESTS AND DISEASES OF SQUASH
The key disease of squash and pumpkins is powdery mildew. You will see a light grey coating to the upper side of the leaves. They will soon start to shrivel and die.
The cause is lack of water or irregular watering. The solution is to pick off and burn the infected leaves as soon as you notice them and water the plants regularly. For more information on powdery mildew, see our page here.
END OF ARTICLE
Adjustable Calendar For Growing Squash
Where to Grow Squash
When and How to Sow Squash Seeds
Planting Out Squash Plants
Growing squash and Pumpkins in Containers
Care Plan For Squash and Pumpkins
Supporting Squash and Pumpkins
When and How To Harvest Squash
Pests and Diseases
HOW TO GROW SQUASH AND PUMPKINS
First, what is the difference between a squash and a pumpkin? It’s easy really. Pumpkins are just a type of squash but they are still a squash.There is no botanical term “pumpkin”. It’s just a word used by gardeners and shoppers which identifies those largish, bright orange squashes that have become so popular at Halloween.If you want to cook the flesh of a squash, we would avoid pumpkins. They are not particularly sweet and other squashes bake better.