SAVING TOMATO SEEDS
Article by David Marks
Saving tomato seeds is easy and virtually fool proof with the step by step instructions below. First we explain why the fermentation process will produce healthier seeds which can be stored for longer and then we go though the process step by step.
You can simply scoop out the centre of a tomato, run water through the seeds and “goo” to end up with “clean” tomato seeds which then be dried and stored. But this does not mimic the natural process and you will end up with seeds which will germinate the next spring most of the time but not all of the time.
You can also end up with seeds which produce plants of low quality if you take shortcuts. By fermenting the seeds first you will end up with top quality seeds which keep for five years or more, have a high germination rate and produce true to type, healthy plants. Below we explain the reason for this. If you are in a hurry to get on with saving your tomato seeds, click here to skip the explanations.
WHAT TOMATO SEEDS ARE BEST TO SAVE
First, do not save seeds from F1 varieties unless you have a specific reason for doing so. F1 seeds may or may not grow true to type, there is no way of knowing other than to experiment, see here for more information.
All F1 seeds should be supplied in packs clearly marked with “F1”, that’s the law in the UK. If you have lost the seed packet, then click on either of the two lists below (in alphabetic order) to identify which common tomato varieties are F1 and which ones are open pollinated.
BENEFITS OF FERMENTING TOMATO SEED
Saving tomato seed using the fermentation process is the closest the average gardener
can come to mimicking what happens in nature. When a ripe tomato naturally falls to the ground the ground temperature is generally too cold for it to germinate. Also the “goo” around the tomato seeds reduces the chance of them growing immediately. The exact process that occurs is not known.
In spring, the warmer temperatures bring back the seeds into life and cause them to germinate. This usually happens when the “goo” surrounding the seed has long disappeared.
So, to mimic nature it is easiest to allow the tomato seeds to ferment, as they do in nature, and then wash away any residue. If any residual liquid is left it is liable to become infected – not always but occasionally it does happen.
Another side-benefit of the fermentation process occurs because the seeds are cleaned in water prior to storing them. This allows you to see some of the seeds which are not viable. When placed in water a tomato seed which floats indicates that the seed is not viable. This is because parts of the seed are missing or only partly formed. The weight of a healthy seed will cause it to sink
HOW TO SAVE TOMATO SEEDS
You will need one or more ripe tomatoes, a container, a sharp knife and a teaspoon or similar
STEP 1
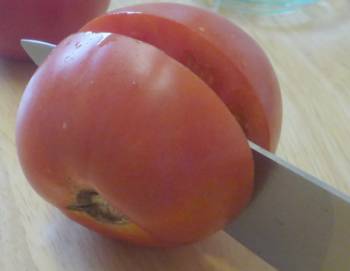
Cut the tomato in half to expose the seeds. The cut is best done halfway between the top and bottom of the tomato to expose the maximum number of seeds.
STEP 2
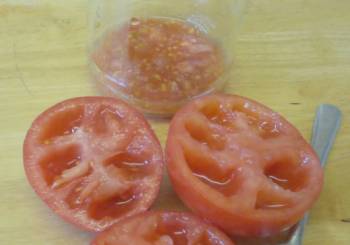
Use a teaspoon to scoop out the seeds and put them into a jam jar or other container. As you do this, include the liquid surrounding the seeds. A small amount of the harder tomato flesh may also be included but don’t worry about this. The picture below shows the seeds removed.
It is possible to simply squeeze the tomato halves to extract the seeds but the seeds at this stage are soft and easily damaged. As a general principle, try to avoid handling the seeds at this stage to avoid damaging them. You will only notice the damage done when some of the seeds fail to germinate.
We also don’t recommend adding any water at this stage. Tap water contains chlorine which won’t damage the seeds but can slow (possibly even stopping it completely) the fermentation process. A small amount of rain water can be added instead but we have seen no benefit in doing this.
STEP 3
Cover the top of the jar with cling film, cut a couple of slits in it and place in a warm, dry and dark / shaded position. The temperature should be in the range 21°C / 70°F to 25°C / 78°F, about room temperature of a centrally heated house or a couple of degrees higher.
Higher or lower temperatures significantly reduce the quality of the seeds. The liquid scooped out with the seeds will naturally prevent them germinating for the moment.
STEP 4
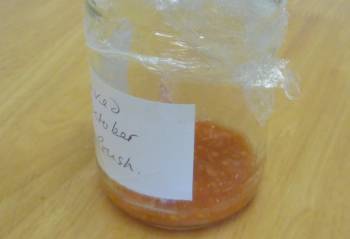
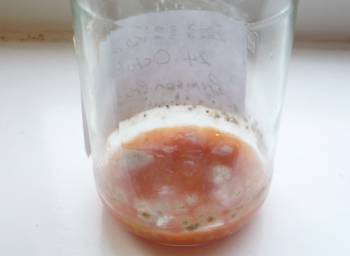
The ideal length of time to store the seeds in this state is 2 to 3 days. For those who like an “in depth” study see this article here which tested out the effect of different fermentation times. To summarise the test, a fermentation period of 36 to 72 hours is the ideal. Much longer and the seed quality will be reduced. Mould in varying degrees will form on top of the seed mixture (see picture below) which is fine.
STEP 5
This step is intended to remove the goo surrounding the seeds and any mould which may have formed. Fill the jar with water (tap water is fine at this stage) and shake the jar (with a lid on it of course!). Pour off the top liquid leaving the seeds in the jar. Repeat this four or five times until the liquid is running clear and the goo is removed.
Finally. let the liquid and seeds settle for a couple of minutes, fish out and throw away any seeds which have not sunk to the bottom. Tomato seeds which float after cleaning are, in all probability, defective.
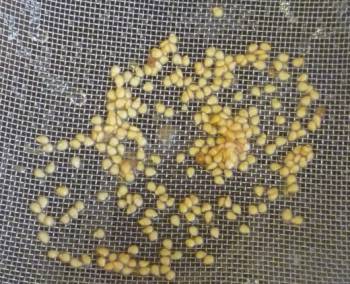
Pour the liquid and seeds into a fine sieve or tea leaf strainer. Rinse gently with running water until the seeds are clean. You may need to fish out the odd lump of tomato flesh.
STEP 6
You now need to dry the seeds. The plan is to place the seeds on a surface which will absorb some of the liquid and then leave them on a plate to dry out completely. Don’t place them on paper towels because as they dry they will stick to the surface. Some recommend coffee filter paper which is fine if you have it.
We place the seeds out on cheap paper, the envelopes from marketing blurb which comes through the post are ideal as long as they aren’t glossy. Leave the seeds there for an hour or so and then tip them onto a plate to dry out completely.
STEP 7
Tomato seeds in good condition will store for five years or more in the correct conditions. When the seeds are completely dry put them in a marked (dated and variety name) paper envelope (another use for the marketing “blurb” which drops through your letter box!) and store them in cool, dry and dark conditions.
Sometimes life throws a wobbly and things don’t work out as expected. For this reason we suggest that you test a few of your saved seeds at this stage to ensure they will germinate successfully.
To do this, place them on a wet surface (the wetted envelope of the marketing blurb that comes through your door is excellent) in a warm place at 21°C / 70°F to 25°C / 78°F, about room temperature of a centrally heated house or a couple of degrees higher.
![]()
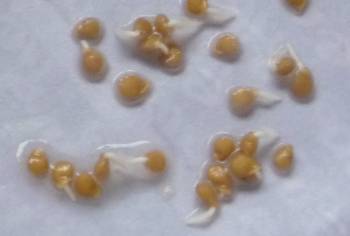
Wait for a week and during that time you should see a little sprout appear from the side of each seed which indicates that they have germinated successfully. The picture above shows some of the seeds shown in the pictures above – success! 100% germination rate although clearly some are more advanced than others.
COMMENTS / QUESTIONS LEFT BY OUR READERS
ANSWER:
WHY NOT LEAVE YOUR QUESTION / COMMENTS ABOUT THIS PAGE?
ENTER THEM BELOW. EMAIL ADDRESS IS OPTIONAL.
YOUR COMMENTS WILL BE ADDED ABOVE WITHIN A FEW HOURS.
[contact-form-7 id=”1882″ title=”Contact form 1″]