Pest

OUTDOOR TOMATO PESTS AND DISEASES IN THE UK

By David Marks

This article will help you identify which pest or disease is affecting your tomato plant and the options you have, both natural and chemical, for treating the problem. With our unique step by step identification process you can easily narrow down the problem which is affecting your plant in simple steps. There are thirty plus diseases that can affect tomatoes and probably just as many pests but the good news is that most of these affect greenhouse grown tomatoes and have little or no effect on tomatoes grown outdoors.

STEP 1
Identify which part of your tomato plant is affected with pest or disease by clicking on the relevant part of the diagram below, fruits, leaves, seedlings, stems or roots. Clicking on an affected part will take you to a new page which deals exclusively with all the tomato pests or diseases which can attack that particular area. If more than one area of your tomato plant has a problem, click on the area that is affected the worst, you can always return to to recheck the other areas.

Tomato pest and disease identifier, step 1
,

GENERAL ADVICE FOR GROWING HEALTHY OUTDOOR TOMATOES

Using the above diagnostic tools will help you identify and treat specific problems with your tomato plants. However there are a few general cultivation tips which will go a long way towards avoiding many of the problems in the first place. These apply equally to growing tomatoes in the ground, grow-bags and containers.

  1. Cleanliness is a vital rule with tomato plants. Many pests and diseases start off first in decaying foliage left near the base of the plant. Clearing up dead leaves and other decaying matter near the plant is vital.
  2. Watering to ensure a constant and even supply of moisture at the roots is crucial for healthy plants. Tomatoes hate stress and uneven watering causes just that.
  3. Pruning is key if you want the best crop of tomatoes but as far as pests and diseases are concerned concentrate on removing foliage near ground level. Any leaves or stems touching the ground or within 5cm / 2in of it are primary targets for soil borne pests and diseases.
  4. Keep foliage as dry as possible. A constant and even supply of water is very important for tomatoes but it is the roots which need the moisture not the foliage. Water on foliage, especially at night time, is a magnet for diseases as far as tomatoes are concerned.

Pest

By David Marks
Sweetcorn are one of the least troublesome vegetables to grow in the UK especially once the seedlings have established themselves and started to grow away strongly.

Young seedlings are often attacked by pigeons but we have a fire-proof and almost free solution to that problem.  After that stage, sweetcorn in the UK are virtually pest and disease free aside from the dreaded slugs – yes slugs, read more below about the leaf damage they can cause.

BIRD DAMAGE

See our previous page here for a cheap and very effective method of controlling bird damage.

SLUG DAMAGE

In years when slugs are thriving they can often cause immense damage to young and not so young sweetcorn plants. They eat the leaves and the damage they cause is often mistaken for other pests because it is unlike the damage caused normally by slugs. The the pictures below show just what happens.

Slugs eating sweetcorn leaves
A slug eating the leaves of a young sweetcorn

The slug which causes the damage is typically a small whitish one you can see in the picture above, click the picture to enlarge it and see more clearly. Towards the top of the picture you can see the damage done to the leaves.


Leaf damage to a sweetcorn plant

The above picture (again, click to enlarge it) shows more clearly the odd damage done to the sweetcorn leaves. It's reduced the leaves to an almost lace like consistency and shredded it entirely. The reason for this peculiar form of damage is simple, the leaves of sweetcorn plants have strong ribs to them which the slugs find difficult to eat so they attack the softer parts in between the ribs.

Slugs are one of the gardeners worst enemies and they can decimate a crop of young sweetcorn in less than a week if left to their own devices. That plant pictured above was fine five days ago! And the slugs didn't only eat one plant they ate all sixteen of my plants in the same time frame. Our page dedicated to identifying and dealing with slugs can be found byclicking here.

YELLOWING LEAVES ON SWEETCORN

The lower leaves of sweetcorn frequently turn yellow and then die down. If the majority of the leaves look green and healthy then you don't have a problem. If the top of the leaves are turning yellow then this is probably a nitrogen deficiency. A dose of a nitrogen rich fertiliser should cure the problem.

NO TASSELS PRODUCED

One of our reader’s asked why their sweetcorn has produced no tassels or cobs. Without tassels being produced then no cobs will be produced so the real question is simply why are no tassels produced. The key reason for this is that some form of stress has occurred to the plant at the time tassels would normally begin to be produced.

The first possible cause of this is unusually high temperatures. However in the UK the temperatures are very unlikely to reach those levels. By far the most likely cause is a lack of water at the key time when tassels would normally be produced. The solution is to ensure the plants are watered in dry periods throughout their life. Mulching around the plants with organic matter (grass clippings are fine) will help ensure an even supply of water to the roots.

MORE PAGES ABOUT GROWING SWEET CORN:

Sometimes our readers ask specific questions which are not covered in the main article above. Our new
Sweetcorn comment / question and answer page
lists those comments, questions and answers. At the end of that page there is also a form for you to submit any new question or comment you have.

Pest

By David Marks
The key pests and diseases are aphids, slugs / snails, flowers which fail to produce beans and halo blight.

Problems often first occur when beans rot before they can grow – annoying but a quick re-sow normally solves the problem. Aphids can sometimes get out of control if not treated as soon as they are noticed. Our write up below lists a few quot;homemade" methods of combating aphids as well as the standard advice.

RUNNER BEAN APHIDS

SYMPTOMS

Runner Beans suffer aphids (small blackflies and greenflies) to the same degree as many other vegetables. You will know the plant has them because there will be lots of massed black / green tiny aphids on the leaves and stems – they tend to prefer the new growth and the undersides of leaves but will spread all over the plant if left to their own devices.

It’s also likely that you will see ants crawling up and down the stems and stems, these are
affectively farming the aphids and will only make the problem worse. The aphids secrete a sticky sweet substance and this attracts mould which you may also notice.

HOW TO GET RID OF APHIDS ON RUNNER BEANS

We have a page dedicated to treating blackfly and greenfly which can be found here. That page offers all the standard advice on getting rid of aphids but at the same time it has become apparent that there are a range of not-so-standard remedies which lots of gardeners use. A few of these are listed below, we leave it up to you to decide if they are worthy of trying or not.

THE GARLIC DRENCH
It's well known that simply spraying you plants with slightly soapy water will reduce the number of aphids. This method involves leaving three or four crushed garlic cloves to soak in the water before spraying it on. The theory is that insects don't like garlic so garlic in the water will repel them.

SUNFLOWERS
If ants are farming the aphids then a couple of sunflowers grown nearby may well interest the ants more than the runner beans. The ants will then herd the aphids to the sunflowers.

SEMOLINA AND FARMING ANTS
Many gardeners report that simply killing farming ants (ant powder will do the job) reduces the amount of aphids. One recommendation for killing ants is to  put a small piece of semolina near the ants. Apparently they take it back for the queen ant to eat but she cannot actually digest it and explodes!

OXALIC ACID
Rhubarb leaves contain a fair amount of oxalic acid (enough to cause severe discomfort if humans eat them) which can be used to kill aphids. Cut the leaves into bits and boil them then leave them to simmer for five minutes. Add a tablespoon of washing up to the liquid and spray over the aphids.


Victoriana Nursery Runner Bean seeds

SLUGS AND SNAILS

Slugs and snails love to eat young runner bean plants and can often cause irreversible damage over a single night. We have a special page devoted entirely to slugs and snails (click here) although runner beans respond to specific preventative measures which are particular to them.

Two characteristics of runner beans can be used to their advantage when preventing slugs and snails. First the plants grow very quickly so they are only at risk for three weeks or so, after that slugs and snails will tend to leave them alone. Secondly they will be growing above ground in early summer at first and although dry weather is not guaranteed it is likely.

With the above two factors in mind we recommend sprinkling fine multi-purpose compost around them so that it encircles each plant by about 15cm /6in. Slugs hate crawling on dry, fine multi-purpose compost, it clogs up their crawling mechanism. If it does rain enough to wet the compost significantly then apply the dry compost again. This method used in conjunction with others on our slug / snail page will dramatically increase your chances of success against the gardeners number one enemy!

Another very successful solution for small runner beans is to use large plastic bottles which previously contained soft drinks. Cut the bottoms off and place the top bit (without a cap on) over the young plants. It will act as a mini-greenhouse and provide lug and snail protection (see the picture below). If you use the plastic bottle as in the left of the picture remember to remove it in warm weather because it will trap lots of heat.

Plastic bottle used to prevent slug damage to runner beans

FLOWERS FALL OFF BUT THERE ARE NO RUNNER BEAN PODS

This is a “condition” rather than a pest or disease. The most common cause is that the pods have failed to set. Pods are set (pollinated) by bees principally and a lack of bees and other insects could cause this problem. Higher than normal night time temperatures can also be the reason. Another major cause of this condition is lack of water which causes the runner bean plant to effectively close down. Lots of watering or rainfall will solve the problem.

HALO BLIGHT

Picture is courtesy of Oregon.gov. The symptoms are first noticed when the very young leaves turn brown and some will fall off. The leaves which survive will have brown markings on them with a yellow "halo" type outer edge. Stems may also have brown spots on them.

The disease is first introduced on infected seeds ether because they have been infected before you bought them or, more likely, the infection develops in seeds past their sell by date. One "good" point about this disease is that it does not stay in the soil so infections which occurred in previous years will not be in the soil the next year.

Halo blight on runner beans

The best course of action for this disease is to remove affected plants and re-sow with new seeds from a different source. Because the disease affects very young plants you will almost certainly still have time to raise new plants. If you have sown infected seed and then water your plants the disease can be spread to nearby plants.

RUNNER BEAN SEEDS HAVE ROTTED

The symptoms are simple, you plant your runner bean seeds and they don’t come up. If you burrow in the soil where the beans were sown and find them but they are soft and mushy then they have rotted in the soil. Almost always the cause of this is sowing the seeds too early which causes the cold weather to prevent them from germinating. Runner beans will only germinate in soil temperatures of at least 10°C / 50°F and if the soil is particularly damp the minimum will be higher. Aim for a soil temperature of 16°C / 50°F to avoid problems with runner bean seeds rotting.

The solution is to either sow them outdoors later in the year or start them off indoors and plant them out when the weather is warm. For your, or average, UK conditions (set your location by clicking here to be more accurate) the key dates for sowing and planting out runner beans are:

  • Sow beans indoors – the first week of May
  • Sow beans outside – end May / very early June 2017
  • Plant out beans grown indoors – the last week of May

One word of advice if some of your runner beans are not germinating when sown in pots. Most beans will germinate within a week but sometimes they take two to three weeks. If no signs are seen above the soil after two weeks turn the pot up and tip out the soil gently in your hand. You may well see that the roots are growing in the soil even though the plant hasn't appeared above the soil surface. If you can see roots then the plant will soon grow.

LEAVES HAVE BROWN / GREY MARKS

This is normally not a pest or disease but a condition caused by harsh weather conditions. The most common cause is wind damage often, but not always, combined with dry ground. A prolonged cold spell after the runner beans have started to grow can also cause this problem. A picture of typical leaf damage caused by wind is shown below.

Wind burn and damage to runner bean leaves
Wind burn damage to runner bean leaves

Sometimes the leaf discolouration is minimal but the leaves also appear limp. If wind damage is likely to occur most years, your only solution is to plant in a more protected position, a fence is one obvious option. When the damage has occurred it’s best to let the plant recover of its own accord although a feed
with a general purpose liquid fertiliser can only help.

Unless some of the leaves are completely damaged let them remain on the on the plant. Even small areas of green leaf is capable of absorbing sunlight and converting it into energy. The plant should recover of its own accord in two weeks time.

GREEN SHIELD BUG

The Latin name for this bug is Palomena prasina and it is often found on runner beans and French beans as well as a range of other vegetables and ornamental plants. They do feed on the sap of runner beans but it is to such a small degree that you will notice no damage even though they do look a bit scary!

Green Shield Bug

Adult Green Shield Bug
Picture courtesy of Virtual Fauna of Lakeland

In its pre-adult stage the Green Shield Bug lacks the tail end brown mark but
has three brown stripes over a third of its back.

In 2004 a new species of bug appeared in the London area and was given the name of Southern Green Shield Bug. As of 2016, it has remained exclusively in that area and does not appear to have spread. It is in fact a different species altogether called Nezara viridula. To date it has not reached sufficient numbers to do significant damage although it can cause mishapen leaves and a slight lack of vigour to the plant overall.

It looks very similar to the picture above but lacks the brown / black mark at the end of the body.

NEXT PAGE – REVIEW OF RUNNER BEAN VARIETIES

COMMENTS / QUESTIONS LEFT BY OUR READERS

Sometimes our readers ask specific questions which are not covered in the main article above. Our
Runner Bean comment / question and answer page
lists their comments, questions and answers. At the end of that page there is also a form for you to submit any new question or comment you have.
 

Pest

By David Marks
Rhubarb is definitely one of the most robust vegetables and suffers from few pests and diseases but occasionally they do have problems.

Crown rot aside, which we explain below, the main problems are a variety of bugs mainly chomping away on the leaves and occasionally even the stalks. Slugs, snails and beetles are the main culprits. Before rushing to the chemical cabinet though, remember that you don't eat the leaves. So, unless the damage is very extensive, it may well be best to simply ignore the pests.

CROWN ROT

This is easily identified because as the name suggests, the crown of the rhubarb ((the central woody bit) rots! After a couple of weeks it will literally turn to mush and die away. The stalks and leaves are also killed. The cause is a variety of fungi attacking the plant. In normal growing conditions this won't happen but when the soil becomes very wet and waterlogged this encourages the fungi to flourish. There is no cure, the entire plant should be dug up and burnt, don't put it on the compost heap. The fungi will remain in the soil for a few years so if you plan to plant replacement rhubarb, and don't want crown rot, then plant them in a different place in your garden.

A major factor which will increase the risk of crown rot is having the central part of the plant infested with weeds or anything which covers the crown. This will encourage excessive moisture retention and also slug damage which will allow fungi to enter the crown surface. Although rhubarb often grows well when ignored, it is best kept weed free.

RHUBARB LEAF DAMAGE

It's very common for rhubarb leaves to be attacked by slugs and snails. They leave a patchwork of holes in the leaves but don't cause any other damage. We strongly suggest that you don't use any pellets or other chemicals unless the damage is very severe.

Most rhubarb plants will survive slug and snail damage easily and as the leaves get older in the season the slugs and snails will leave them alone – they prefer younger leaves near the ground.

Leaf damage to rhubarb

Although we don't recommend chemicals for slugs and snails on rhubarb, there are a couple of things you can do to reduce the problem.

First, keep the area around your rhubarb clear of weeds and other debris – both of those provide an ideal environment for slugs and snails.

Keep a look out for slugs and snails around the central base of the plant and dispose of them whenever you see them. This will go a long way to keeping your rhubarb free from leaf damage.

Slug damage to the central part of rhubarb

WEAK GROWTH, YELLOW LEAVES

Occasionally rhubarb will show signs of below normal growth and this may also be accompanied by yellowing leaves. This is unlikely to be a pest or disease but much more likely to be something in its environment which is causing a problem.

If the soil is light or sandy your plant may not be getting enough nutrients. Rhubarb loves lots of plant food so that is definitely a solution worth considering. A couple of handfuls of blood, fish and bone fertiliser spread around each plant in February and August time will provide them with a good source of nutrients.

They also like lots of moisture in the summer, not waterlogged but moist soil. A full sun position can sometimes be a problem, especially in warmer parts of the UK. Rhubarb grows best in partial shade especially from June to August.

If you "force" your rhubarb, don't do this on the same plant two years running. Forcing rhubarb weakens the plant and if you do this two years in a row the plant will definitely suffer and show signs of weak growth.

Finally, don't harvest rhubarb stalks in the first year and only take a few in the next year. Harvesting too many stalks reduces the amount of leaves and these are the plant's major source of harvesting and making use of sunlight.

RED EDGED LEAVES

This normally occurs late in the rhubarb year (after all, they get an early start!) when the leaves are beginning to think about dying down, typically in July onwards. See the picture below sent in by one of our readers which illustrates this perfectly.

Red edges to rhubarb leaves
Image copyright
Picture courtesy of Rosemary G

It looks quite dramatic on some leaves and may cause concern but it’s all natural. Those red colours are present in the leaves most of the time but the chlorophyll (used to convert sunlight to energy) in the leaves hides the red and gives them their green colour. As the season progresses some leaves decide to start shutting down for winter and use the energy stored in the rhubarb crown as the key source of energy.

As they shut down they produce less chlorophyll and that exposes the red colouring in the leaves. It’s most apparent in older leaves, as in the picture above, and it starts at the edges of the leaves and slowly moves inwards. Not all leaves are affected and different varieties of rhubarb are affected more than others.

Rhubarb grown in full sun is also more likely have red leaves because they have more residual glucose in them compared to rhubarb grown in part or full shade.

ORANGE / RED SPOTS ON RHUBARB LEAVES / STALKS

The spots are the fungus called rust which are most common on the leaves but they can also infect the stems of rhubarb. The fungus thrives in moist conditions where air-flow is restricted. It does not damage the crown although the crown can be weakened if the leaves are badly infected and cannot photosynthesise correctly.

To prevent and minimise the effects of rust on rhubarb do the following:

  1. Remove badly infected leaves and stems although those with only mild symptoms can be left on the plant. Destroy badly infected leaves and stems, do not put them on the compost heap.
  2. Clear all vegetation around the rhubarb plant to allow maximum air flow through it.
  3. Do not feed the plants with nitrogen based fertiliser which would only encourage soft, leafy growth which is susceptible to rust.
  4. The key action you can take to avoid rust recurring in the next year is based on the fact that rust requires vegetation to exist. When the stems die down remove all trace of them and any other vegetation around the crown. This includes leaves and any other debris which is present.

HOLES IN RHUBARB STALKS

This is best illustrated by the picture below showing the cut end of a rhubarb stalk. There are hollow holes running up the centre of the stalk.

Holes inside rhubarb stalks
Picture Copyright Notice
Rhubarb stalk with holes in the centre

This is typical of rhubarb stalks which have been picked when they are past their best. The stalk is beginning to deteriorate form the inside and is useless for eating. Rhubarb should be picked when it is young and tender. Leaving it too late to pick results in a very stringy texture and unpleasant taste.

COMMENTS / QUESTIONS LEFT BY OUR READERS

Sometimes our readers ask specific questions which are not covered in the main article above. Our
Rhubarb comment / question and answer page
lists their comments, questions and answers. At the end of that page there is also a form for you to submit any new question or comment you have.


Pest

JAPANESE MAPLE TREES IN THE UK

Article by .
INTRODUCTION
Japanese Maples have been cultivated in Japan from the late 1500s. Their popularity increased and has led them to being cultivated in many other parts of the world over the last 150 years or so.The definition of a Japanese Maple tree is not easy because there are several systems of classification in existence at the moment. Indeed, the currently favoured classification system devised by P. C. de Jong identifies only three subspecies of acer palmatum. This site concentrates on acers which can be bought in nurseries and garden centres. Generally, the horticultural trade names them Acer palmatum and Acer japonicum.


SPELLING

Another common problem with identifying a particular Japanese Maple is that many of them are English interpretations of the original Japanese name. Unfortunately several Japanese sounds are not represented in the English alphabet and more than one spelling exists. This difficulty is slowly being eradicated however as plant naming conventions are increasingly becoming standardised world wide.

SEASONS OF INTEREST
From early October through to late November many Japanese Maples are transformed in a blaze of red and orange leaves. This occurs at a time when most other ornamental plants and trees have long passed their best.

This is a spectacular show but from April to September Japanese Maples also delight with their overall form and the colours, textures and shapes of leaves. So consider what your tree will look like in the six months prior to October to gain the full benefit from these spectacular trees.
Green leaf of Katya

SIZE AND FORM
Japanese Maples are unusual as a group of trees in that they span a huge varieties of sizes. Left un-pruned the acer palmatum can easily grow to 12m / 40ft high. At the same time, the dwarf varieties, such as Koto Maru will never exceed 1.5m / 5ft in height. Combine this with a variety of habits, from weeping to upright, and it is clear the choice is huge with many varieties suitable for all types and sizes of garden.
Read leaf Japanese Maple tree

WHICH MAPLE TREE FOR YOUR GARDEN?
Probably the best place to start selecting a Japanese Maple tree for your garden is in our picture gallery. This shows pictures of a large number of Japanese with brief details. Click on any picture for lots more details about that particular Japanese Maple.

CULTURE OF JAPANESE MAPLE TREES
This site covers a wide variety of cultural advice from propagating your own Japanese Maples to growing them in the garden or in containers. Use the links at the top left and bottom of each page to navigate to the different topics.

Overview

END OF ARTICLE

Pest

By David Marks

PEA MOTH

This is one of the main pests of pea plants. You won’t notice it until you come to harvest your peas when you will find many of them with an ugly looking muck where the bug has eaten into your peas.

Greenfly insecticides can be sprayed on the plants but the problem is that they need to sprayed when the flowers are open to kill the Pea Moth. But this is exactly the time when pollinating insects will be out and about. So spraying at the correct time will kill pollinating insects.

The best cure for pea moth is prevention, by covering your plants with insect proof mesh. Climbing
peas tend to suffer far less from this pest.

MILDEW

A white powdery film covers the leaves and stems. Avoid this problem by incorporating lots of organic matter in the soil before sowing / planting and water well when conditions are dry. Basically, plants under stress are susceptible to powdery mildew so good ongoing care is the best way to prevent it.

We have an in depth article on identifying, preventing and treating Powdery Mildew which can be found
here.

PEA LEAF WEEVIL

Pea leaf weevils are small grey beetles around 5cm / 2in long when fully grown. The damage they cause is easily identified. They cut small notches into the edges of leaves.

Pea weevil and damage
Pea Leaf Weevil and damage
Courtesy Shelley Barkley, Alberta Agriculture and Forestry

Under normal circumstances the damage caused by pea leaf weevils is tolerated by pea plants with no effect on productivity so it is best to just ignore them. Sometimes young seedlings can suffer badly. If that has happened to you before then cover the young seedlings with insect mesh when you plant them or sow seeds.

Chemical sprays are available available to control these pests, products such as Bug Clear Gun containing pyrethrum are the most effective. Do not apply any chemical sprays when the pea plants are in flower.

COMMENTS / QUESTIONS ABOUT PEAS LEFT BY OUR READERS

Sometimes our readers ask specific questions which are not covered in the main article above. Our
Pea comment / question and answer page
lists their comments, questions and answers. At the end of that page there is also a form for you to submit any new question or comment you have.

BACK TO MAIN PEA PAGE
 

Pest

By David Marks
Onions are a reasonably healthy vegetable crop in most cases but when they do succumb to a pest or disease it is often serious and can be difficult to eradicate from the soil for several years.Crop rotation is absolutely essential for growing a healthy onion crop. A second key essential is to remove all traces of the onion crop from the soil after harvest. If any are left in the ground they are liable to infection over the winter.

CLICK HERE TO SKIP TO PEST AND DISEASE IDENTIFICATION

MOST DISEASE RESISTANCE – SETS OR SEEDS?

One common discussion point amongst gardeners is whether onions grown from sets or seeds are more prone to this or that disease. In 2014 eelworm was a major problem with many gardeners reporting that either sets or seed grown onions were better or worse. There is no common consensus in reality other than the fact that buying onion sets from a reputable supplier is essential for avoiding pests and diseases.

In all likelihood the variety of onion has a far larger influence on disease and pest resistance compared to growing from set or seed. But fact-based research into the pest and disease resistance of various onion varieties is in its infancy and very hard to find. This erudite article produced by researchers goes into great detail about Fusarium Basal Rot, one of the plagues for onion growers, but fails to come up with a comparison by variety, it’s all about what may happen in the future.

The only research we can find which comes up with solid facts about a few different varieties is from the Agriculture and Horticulture Development Board. But even that article is very limited as far as facts go which might be useful to the average gardener. All we could gather from it is that red coloured onions have a lower yield and slightly shorter storage life compared to brown coloured onions.

Storage life is an important factor overlooked by the average gardener although almost all want their onions to March or April the next year. Storage life is most definitely dependant on the variety chosen. To take this point to absurdity, Japanese onions have a storage life of a matter of weeks whereas some maincrop brown skinned onions have a storage life in excess of six months.

But here’s the “fly” (pun intended!) in the ointment for onion storage. According to the Agriculture and Horticulture Development Board research mentioned above, the onion variety Red Baron (very common commercially and for amateur gardeners) is both the best and the worst of all the onions tested as far as storage is concerned. Red Baron onion sets from the English Set Company, stored until March the next year, have a survival rate of 74% but the same variety from Broer / Elsoms have an appalling survival rate of only 27%.

What we advise, from all the research to date, is to grow an onion variety which is to your liking (seed or set, whichever suits you), works well in your garden / allotment and ignore all the advice you receive from other sources. If you like them and they work for you then stick to your guns.

Now we’ll get to the real point of this article, a list of common onion
pests and diseases, how to identify them and how you can prevent and / or treat them if things go wrong.

ONION BOLTING

Flowering onion plants
Onion flowers show bolting has occured

The first thing you will notice is that one of the central leaves will begin to form a capsule at the top end of it. This will quickly emerge as a flower. The flower head will then die off revealing the onion seeds. Even though the plants has ….. Click here to go to the full article about bolting onions.

ONION FLY

Maggots of the onion fly

The first signs become visible on younger developing onions. The leaves wilt and turn brown, these symptoms also then occur on more mature plants. The top of the bulb may smell slightly and will begin to rot. Maggots may well be visible in it. Gardener’s sometimes confuse onion fly with white rot because the above ground ….. Click here to go to the full article about onion fly.

ALLIUM LEAF MINER


Distorted onion leaves

The Allium Leaf Miner attacks leeks, onions (almost exclusively spring sown / planted ones), shallots and other members of the onion family. The first problem you will probably notice is that the leaves becomes distorted and don’t grow in the normal straight and upwards manner, some leaves will lie on the ground. If you look ….. Click here to go to the full article about Allium Leaf Miner.

ALLIUM WHITE ROT

PICTURE COMING SOON

Dig an infected onion up and you will see it looks rotten and feels soft to the touch. White and powdery mould will have formed on the base of the onion with black spots in advanced cases. There will be no signs of grubs or pupae (unless as a secondary infection) because this is a fungal disease (Sclerotium cepivorum) and not ….. Click here to go to the full article about Allium White Rot.

ONION NECK ROT

The damage will almost certainly not be visible until the onions have been in storage for a couple of weeks. At first the top part of the bulb will turn browner and the skin will be darker brown. If you gently push the top of the bulb at this stage it will be softer than the lower parts. Mould will then ….. Click here to go to the full article about Onion Neck Rot.

ALLIUM RUST


Symptoms of Allium Rust

Often simply called Leek Rust, it affects onions, leeks, garlic and chives.Rust is a fungal disease which attacks the allium family of plants the worst affected being leeks, onions and chives but onions are also sometimes affected. The Latin name for the fungus is Puccinia allii and it first makes an appearance in mid to late June time. It thrives in areas of ….. Click here to go to the full article about Allium Rust.

COMMENTS / QUESTIONS LEFT BY OUR READERS

Date: 28 July 2015 From: Roger Cook
Got onion fly in my big kelsies. They were coming
along a treat, what to do with them now?ANSWER: There are no pesticides or treatments for onion fly. Prevention of this happening again next year is your only course of action. Click here for
our article on onion fly.


Date: 18 February 2015 From: Alan Morrison
A very comprehensive explanation of how to grow onion sets. Doesn’t leave any more questions to be asked!

WHY NOT LEAVE YOUR QUESTION / COMMENTS
ABOUT THIS PAGE?
ENTER THEM BELOW. EMAIL ADDRESS IS OPTIONAL.
YOUR COMMENTS WILL BE ADDED ABOVE WITHIN A FEW HOURS.

    Your email address (optional),
    I will email you when town is added:

    Your Name (optional):
    Your Town:


    Pest

    LETTUCE PESTS AND DISEASES IN THE UK

    By David Marks
    Lettuce are generally very healthy plants and the main reason for failure is lack of water and not harvesting correctly. However they do occasionally suffer from pests and diseases and the main ones are described below.

    Amongst the most common diseases of lettuce are mildew and moulds. Greenfly can sometimes be a problem and slugs or snails can do great damage especially to young crops. Root aphids are not visible to the naked eye and can also do great damage

    LETTUCE DOWNY MILDEW AND MOULDS

    This is a fungal infection which is commonly spread in the air on windy days although occasionally it can live in the soil. If left to itself the damage caused will attract moulds which further damage your lettuce crop.

    SYMPTOMS
    Yellow spots on the upper side of the leaves are the first signs of infections. As the fungus gains a hold the undersides of the leaves will develop small white patches of mould. The damage is only to the outer leaves but if left untreated will attract various other moulds.

    TREATMENT
    There are no approved chemical treatments available to the amateur gardener for downy mildew on lettuce. To Prevent the spread of the disease remove any affected leaves and burn them, only the outer leaves are affected the rest of the lettuce will be unaffected and is perfectly edible. It is best to harvest the entire plant leaving no trace of the stalk and roots in the ground.

    A major contributing factor in downy mildew is planting lettuce too closely together so thin seedlings to the correct distance apart. Downy mildew thrives in damp conditions where there is no or minimal air circulation.

    LETTUCE GREENFLY AND APHIDS

    A variety of small flies are attracted to lettuce especially new seedling and young shoots. They eat the leaves and stems and sap the strength from the plant. The goo they excrete is sugary and attracts a variety of moulds.

    SYMPTOMS
    The small flies are visible to the naked eye so detection is not difficult. The flies will congregate around the growing tips and young seedlings.

    TREATMENT
    There are chemical sprays available to the amateur but a leafy plant such as a lettuce will have residues of the chemicals left in the leaves so this form of treatment is not recommended. Systemic insecticides are much more liable to enter the leaves rather than just remain on the surface because that is the intention behind a systemic insecticide.

    The best treatment is to inspect the plants every few days and squash the flies as soon as they are noticed. Spraying gently with a jet of water will also wash off a surprising amount of the flies.

    Pest

    PEST AND DISEASES
    FRENCH BEANS

    SLUGS AND FRENCH BEANS

    Slugs (and in some cases snails) are attracted to tender young beans just emerging from the ground. They eat out the growing tips which can significantly stunt the plants growth. Read our dedicated pages on slug control which can be found here.

    One measure which you can take specifically for French Beans is to protect them when they are very young – in the first three weeks after they appear above ground. This is when they are at their most vulnerable, after this stage the slugs find it difficult to reach the tender growing shoots. Even better is to start the plants off in pots indoors. This will give the slugs only a very small window of opportunity to do much damage.

    One method we use for this is to cover the young plants with large squash or water bottles as shown in the picture below. This method not only protects the young plants from slugs and snails but also protects them from harsh winds and the cold.

    Large plastic bottle used as a protective cloche preventing slug and snail damage

    APHIDS

    Aphids (blackfly and greenfly) will almost certainly appear on your plants at some point in each growing season. Worst affected are the tips of new shoots. Our page devoted to aphid control can be found here. Luckily French Beans are normally not affected severely by aphids and manual and organic control is all that is required.

    FUNGAL INFECTIONS OF FRENCH BEANS

    French Beans sometimes pick up fungal infections especially when the weather is very damp. There is little that can be done to cure the infections and in many cases the beans remain edible even though cropping is reduced.

    To reduce the risk of a fungal infection light prune the plants if parts of the foliage / stems touch the ground. Prune away any foliage touching the ground to avoid rain splashing soil onto the foliage.

    Pest

    By David Marks
    It would be nice to open up this section by saying how resilient Brussels Sprouts are to pest and diseases but unfortunately they do suffer from a few significant problems. This page not only identifies what those problems are but goes into detail about how to prevent them. We have presented the pests and diseases below in the order that you can best apply preventative measures. Measures to prevent club root are presented first because preventative measures can be taken first. Next comes Cabbage Root Fly because collars can be put round the stems at planting time …. and so on throughout the year.

    CLUB ROOT IN BRUSSELS SPROUTS

    This is a very serious disease of all brassicas including Brussels Sprouts, it is also almost certainly totally avoidable unless you have inherited a garden or allotment where it is already in the soil.

    It is serious because once in the soil it will stay there, not just for years, but for decades. It is avoidable because good soil management (we explain this in detail lower down) will prevent it ever occurring.

    PREVENTING CLUB ROOT ON BRUSSELS SPROUTS

    The first measure to take is to practice good crop rotation and never plant Brussels sprouts, any form of cabbage, broccoli, calabrese, auliflower, kale, kohlrabi, swede, turnip, chard, spinach or rocket (i.e. all the vegetables in the brassica family) in soil where they have been grown in the previous three (better still four) years.

    Doing this will prevent the build up of this pest and allow the soil to recover after growing these crops. Our article on crop rotation will help you greatly and our vegetable calendar will automatically generate a crop rotation plan for you if needed.

    The next key preventative measure as far as club root is concerned is to test the soil pH before sowing / planting brassicas. Club root is encouraged in over-acid soil, testing the soil and applying lime when needed will maintain your soil at the correct soil acidity. Easy to do and it requires very minimal expense, click here for more detail on soil pH.

    Badly drained heavy soil is also often a cause of club root. Brussels sprouts prefer a heavy soil, it allows the roots to support to top heavy growth but they do not like a water-logged soil.

    it is quite possible to introduce club root to an otherwise clean site by using transplants from an infected area. Think carefully before accepting any brassicas from a friend or neighbour. They may not realise the plant is infected. Occasionally the disease can be transferred by mud on boots or digging implements.

    HOW TO IDENTIFY CLUB ROOT ON BRUSSELS SPROUTS

    The first sign of club root will be slightly deformed and stunted foliage, often it has a bluish tinge to it. In warm weather the plants will quickly wilt. All this is caused by infected roots which are not able to support the above-ground growth.

    If you dig these plants up the roots will clearly be enlarged, distorted, possibly rotting and black. You will also notice that the more delicate hair like roots common on Brussels Sprouts are almost entirely missing.

    TREATING CLUB ROOT ON BRUSSELS SPROUTS

    In years gone by there were chemical treatments available to the amateur gardener for club root but over the past twenty years or so they have all been banned because of their dangerous side-effects, no chemical treatments are now available.

    All hope is not lost though! First, dig up all trace of any plants in the affected area and burn them. Clean your boots and digging implements away from the garden / allotment.

    The next time you want to grow Brussels Sprouts on that patch of land (four years time if practicing good crop rotation) use a club root resistant variety. This won’t guarantee success but some varieties may well work well on infected land. See our article on recommended varieties for details of club root resistant varieties.

    CABBAGE ROOT FLY

    Cabbage Root Fly attacks should be treated as a fact of gardening if you grow any vegetables in the cabbage family including Brussels sprouts. The good news is that this pest definitely prefers cauliflower and calabrese but Brussels sprouts are definitely on its menu some years.

    PREVENTING CABBAGE ROOT FLY ON BRUSSELS SPROUTS

    The key preventative measure solely to prevent cabbage root fly is to place small discs of material around the stem of the plant. Pre-made discs can be bought from garden centres and diy store or you can make them yourself.

    Cut carpet underlay into squares of about 15cm / 6in, cut out a small hole in the middle and then cut the square from one edge to the centre hole. Place the square around the centre of the plant and this should prevent the female fly from laying eggs in the soil near the roots. This may not prevent all eggs from being laid but it will prevent the vast majority.

    The first generation of eggs will be laid from mid April to mid May depending on weather conditions and it is this generation which causes the most damage. The squares mentioned above need to be in place before the first generation of eggs are laid which means they will need to in place before you transplant your Brussels sprouts to their final growing position.


    Larvae of the Cabbage Root Fly

    Many gardeners place an insect proof mesh over their Brussels sprouts (and other members of the cabbage family) and this will prevent attacks by some of the cabbage root fly but the main reason mesh is used is to prevent attacks by the cabbage whitefly (see further down this article).

    The Cabbage Root Fly, which lays eggs in the soil surface near the plants, finds your Brussels sprouts entirely by scent. Damaged plants and thinnings give off the most scent so thin Brussels sprouts at midday because the flies come out principally in the early evening.

    Several well researched studies have confirmed that the flies initially find crops by smell but this is not all the story.
    Click here
    to read one major paper on this research. It is rather complicated so we have summarised below the findings and limited them to the Cabbage Root Fly.

    Note that the research applies not only to Brussels Sprouts but all plants which are attacked by the fly (e.g. cabbages, calabrese, cauliflower etc.).

    • The cabbage root fly finds the approximate location of a Brussels sprout plant based on scent alone. It will NOT be deterred or confused by the scent of other plants including onions, garlic, marigolds etc.
    • The fly then looks for green leaves (or anything which is green) and lands on one, this selection is completely random – the nearest leaf or green object will do.
    • Using its feet and other mechanisms it tests the object for suitability – is it in fact a Brussels Sprout leaf? Whatever the result (the first time it lands) it then flies to another very nearby green object and tests again.
    • The fly needs to find and test a specific number (about four) of leaves and confirm that they are all Brussels sprouts plants before laying eggs. If the fly lands on a green object which is not a Brussels sprout it has to start the process again.In other words it must land on four separate leaves in succession and find all are correct before laying eggs. Any one landing on a non-Brussels Sprout leaf and it has to start again. Too many “false” landings and it flies off elsewhere.

    Key to the above is that the fly will choose any green object to land on, leaf, stem, man made – anything as long as it’s green. The study concludes that inter-planting (not nearby planting) Brussels sprouts and other green crops greatly reduces the chances of a cabbage root fly laying eggs. They suggest inter-planting with clover because it can easily be dug into the soil and actually improves the soil condition.

    The research also tested man made green cut-out false leaves on a cardboard stem and found that they worked exactly as well as green leaves.

    We leave you to test this out on your own plot. For us in 2019 we will do
    a two part test plus a control group. Test 1 will be to under-plant with clover. Test 2 will be to mulch with lawn clippings, adding more as the existing ones turn brown. Test 3 will be to grow the crop on bare soil which is kept well weeded. We await the results with considerable expectation of success.

    HOW TO IDENTIFY CABBAGE ROOT FLY ON BRUSSELS SPROUTS

    Affected plants will be smaller than normal with grey leaves which easily wilt in warm weather. When the roots are dug up they will have small white maggots either in the roots or in the nearby soil. The roots themselves are very poorly developed. Occasionally the attack can spread to the sprouts themselves although this is unusual.

    HOW TO GET RID OF CABBAGE ROOT FLY ON BRUSSELS SPROUTS

    The first point to note is that there is no chemical spray available to the gardener which will get rid of cabbage root fly. With this in mind we suggest that the preventative measures above are your only real option.

    CABBAGE WHITE BUTTERFLY / MOTH / CATERPILLAR

    This is the one that will drive you crazy! Any brassica leaves including those on Brussels sprouts are a potential meal for this pest. Often called the Cabbage White Butterfly it is the caterpillar stage of this pest which does all the damage.

    The problem is that they munch on the tender inner leaves making it difficult to even see them let alone get rid of them. They can decimate your crop within a matter of weeks if left to their own devices.

    PREVENTING CABBAGE WHITE BUTTERFLY ON BRUSSELS SPROUTS

    There are hundreds of proposed methods of preventing attacks by the cabbage white butterfly but in the end there is only one solution, you need to protect your crop with netting. It’s the only solution which works.

    In our opinion Enviromesh is the best of all the netting options (we have no connection with the manufacturers of Enviromesh whatsoever). It stops insects getting in and at the same time lets light and water in.

    When you first put the Enviromesh in place, as soon as the seedlings emerge, make sure that all the edges are tucked well under the soil, the Cabbage White will find even the slightest gap in your defences.

    Keep the mesh in place for as long as you can, the sprouts will grow tall so you may well not be able to
    provide protection through the later stage of their life but these later attacks are always less severe than the primary attack.

    For a detailed comparison of various insect mesh productsclick here for our in depth article.

    BRUSSELS SPROUTS ARE OPEN AND BLOWN

    The reasons behind blowing of your brussels sprouts is one of the hardest gardening questions to answer so let’s try and shed some light on the problem.

    When Brussels Sprouts produce open florets, rather than tight green buds, they are effectively trying to prematurely produce seeds. Normally this would occur in the year after thay have been planted but something has caused them do this earlier.

    In almost all cases when this happens, not only to Brussels Sprouts, the plant is under stress and believes it is close to dying. Natural in-built reactions force it to produce seed early, albeit smaller amounts, in order to ensure survival of the next generation.

    If you accept that explanation, then the next question is how to avoid or reduce that stress. Sprouts are notoriously difficult veg to grow, having several specific cultural requiements. One primary requirement they have is a system of well developed roots to anchor them to the ground. If they are blown in the wind the underground roots can break causing them stress. Well drained clay soils are their best friend.

    In order to encourage a strong root system, transplanting them at the correct time is the best solution. It encourages new and stronger roots. See here for more details.

    Aside from the notes above, ensure they are watered and fed as described here to reduce stress.


    NEXT PAGE – RECOMMENDED VARIETIES OF BRUSSELS SPROUTS

    Pest

    By David Marks

    BIRDS DAMAGING SEEDLINGS

    In some areas birds can be a real problem when the plants are small. The birds eat the foliage and pull up the seedlings.

    The only solution is to cover the growing area either in horticultural fleece or with cloches. The fleece / cloches can be removed when the foliage is about 10cm / 4in high because the birds are no longer interested in them at this stage.

    Our particular solution to bird damage and beetroots is based on the fact that we grow about 25 of them each year. Over time we have collected large, clear plastic squash bottles and we cut the bottoms off these and use them as mini-cloches over individual beetroot seedlings as they appear.

    It’s important to put them in place the minute you see a seedling appear because this is when the birds (blackbirds and pigeons we suspect) find them most tasty. We remove the bottles when the seedlings have grown to about 8cm / 3in high. At that point the birds seem to loose interest.

    SMALL BEETROOT ROOTS

    There are two main causes of small roots growing on beetroots. Firstly the plants may not be spaced far enough apart. Thin seedlings to 10cm / 4in when they are large enough to handle. Rows should be about 25cm / 10in apart.

    The other common cause of small beetroot roots is feeding them with a high nitrogen encourages leafy growth at the expense of good sized bulbs. Don’t put manure (which may be high in nitrogen) on the growing area for six moths before sowing seed.

    RUST ON BEETROOT FOLIAGE

    Occasionally rust affects beetroot plants especially if they are grown under cover. The symptoms are small, raised brown-red spots which appear on the underside of the leaves. The disease will sap strength from the plant and result in malformed or small roots.

    To avoid rust ensure there is plenty of air circulation especially in damp conditions. Pick off any infected leaves (or parts of them) and burn them. There are sprays available at to control this fungal disease. The spores are spread by wind and can easily be spread from plant to plant.

    APHIDS

    Also known as whitefly and greenfly these little insects look translucent and can be a big problem for many plants. Beetroot leaves are not usually attacked but occasionally they can be. Spray with a pint of water to which a few drops of washing up liquid has been added.

    WHAT IS EATING MY BEETROOT?

    If the root of your beetroot is being eaten it is almost always by a rodent of some sort. Mice and voles are by far the most common pests to cause this damage. A frequent occurrence is that beetroot has been grown successfully for several years in the garden or allotment and then one year, out of the blue, the damage appears.

    What’s happened is that a family of mice or voles have started to nest nearby and found your patch of beetroot. They can decimate tens of plants a night or may only nibble at a couple of them.

    To deter mice or voles you only have two options, trap them (and/or kill them at the same time) or lay bait to poison them. Neither option is appealing to most gardeners but first there is one step you can take to prevent them in the first place or make them move of their own accord.

    Mice and voles nest in loose vegetation which they gather to provide them with warmth in cooler times. Forget hoping to see them during the day because they are night time animals. To deter them, clear up your of loose straw, grass cuttings, plant matter and similar materials which they can use to make a nest.

    Open compost heaps are ideal homes for mice and voles. They burrow down a few inches and the rotting compost keeps them and their offspring warm and safe. Frequent turning of the compost heap will disturb them and their nest and eventually they will move elsewhere.

    As for trapping them there are two types of trap for mice and voles. The first type of trap is designed to kill small rodents and they are known as “break-back” traps. These are the ones sold in hardware stores to kill mice in the home. Over the years the consensus of opinion is that the best bait is peanut butter. For voles chopped up fresh carrots work best.

    When the mice / voles are killed by the trap either bury them or bag them up and put them in the rubbish bin.

    The downside of these traps is that they can attract other beneficial animals such as birds and the traps often don’t kill them, they just trap them and they die a painful death. Kids and adults alike can also be caught out.

    The second type is designed to trap the rodents rather than kill them. By law you need to inspect these traps twice daily to avoid undue pain and stress. The rodents will also need to moved to a new location and a couple of miles away is generally recommended if you want to stop them returning.

    Poisoned bait is intended to attractive to small rodents but at the same time kill them. They are rarely successful in gardens and allotments. You also have the added danger of children or other animals being poisoned by the bait.

    If you have any questions or comments about growing beetroot, their pests and diseases or anything else, leave them using the form below. Our experts will answer them as soon as possible.

    COMMENTS / QUESTIONS LEFT BY OUR READERS

    Sometimes our readers ask specific questions which are not covered in the main article above. Our
    Beetroot comment / question and answer page
    lists their comments,
    questions and answers. At the end of that page there is also a form for you to submit any new question or comment you have.

    BACK TO MAIN VEGETABLE PAGE

    Pest

    By David Marks
    Pear trees are generally easier to manage as far as pests and diseases are concerned compared to apple, plum and cherry trees. But there is no doubt they can suffer from a couple of very serious pests, pear midge being the most common and probably the most difficult to eradicate.

    This article explores all the common pests and diseases which may affect your pear tree. Most of the problem areas have pictures to clearly illustrate the damage caused which helps to identify the pest / disease.

    Feeghgfl free to email us using the form at the end of this page or via our contact us page for advice on pear pests and diseases. Also, please see our question and answer section on pear tree problems at the end of this article. Your question may already have been answered there.

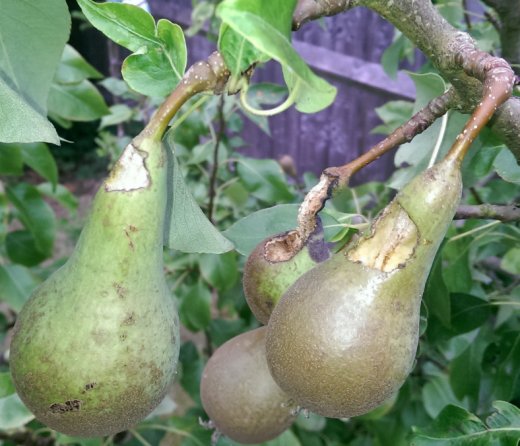
    YOUNG FRUITS FALL OFF, BASE OF FRUIT IS BLACK

    Pear Tree Midge

    This is almost certainly Pear Midge damage. To confirm it cut open affected young fruit and you will find small, cream-coloured maggots inside (see above).

    External signs of pear midge
    Image copyright notice
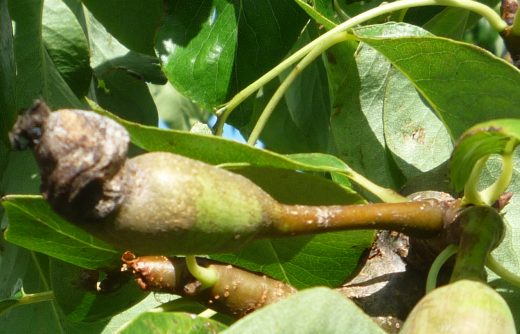
    Pear Midge damage to fruit

    This pest can affect single pear trees whereas other nearby trees are completely unaffected. Affected fruit initially appears to grow larger and “rounder” than other fruit. Read our dedicated article on identifying and treating Pear Tree Midge here.

    DISEASED AND SUNKEN AREAS OF BARK

    Canker in a pear tree

    If you can see a diseased area of bark on your tree then suspect canker especially if it is where a branch has previously been pruned. The bark will be split and slightly sunken at first – the sunken area will become larger as the disease progresses. The disease attacks the fleshy wood beneath the bark first so if you peel off a small bit of bark and see brown diseased wood below then your tree has canker. Canker often appears as ring-shaped cracks in the bark. Click here for full information on identifying, treating and preventing canker on pear trees.

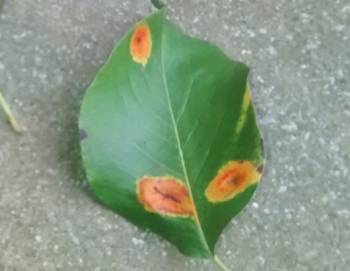
    YELLOW / OLIVE AREAS ON LEAVES

    Scab not only affects the leaves of pear trees it also affects the fruit. As well as yellow and dark green / black spots on the underside and top of leaves you may also see groups of the spores growing as small brown velvety mounds on the underside of leaves. Go to our dedicated scab page for treatment and prevention methods.

    Scab affected leaves
    Picture Copyright Notice
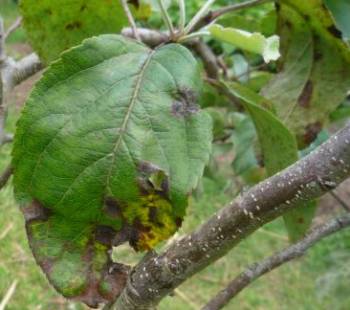
    Leaf affected by Scab

    BLACKENED BLOSSOM AND NEW SHOOTS

    Fireblight in a pear tree

    The symptoms of fireblight are hard to miss even at the initial stages of infection. First the blossoms are infected then new shoots, fruit and finally the main branches can be affected. The key symptoms are ….. Click here for lots more expert information on identifying and treating fire blight on pear trees.

    APHIDS – SMALL INSECTS ON LEAVES

    Aphids on a leaf

    The above picture shows aphids on a blackcurrant leaf but they look exactly the same on a pear tree leaf. Aphids first attack the undersides of leaves and this causes them to curl inwards on themselves. If left untreated the leaves will turn brown at the edges. Read our article on aphids here for expert advice on treating aphids both with chemical sprays and organically.


    SMALL BLACK LEECHES / SLUGS ON LEAVES

    This is the Pear Slug Sawfly (Caliroa cerasi). It affects pear, cherry and apple trees as well as some ornamental shrubs, hawthorns in particular. On fruit trees, the black leech like creatures are in fact green but covered with black slime. The slime is a protection mechanism to avoid being eaten by birds.

    Pear Slug Sawfly
    Copyright notice
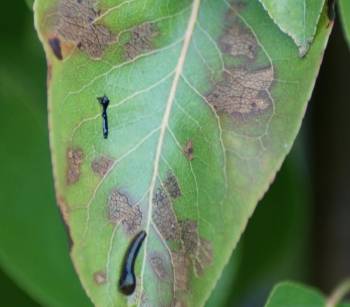
    Pear Slug Sawfly (click to enlarge)

    The lifecycle of the Pear Slug Sawfly starts with the pupae overwintering in the soil beneath the tree. In spring the actual sawflies emerge and lay eggs on the leaves. The eggs then hatch into the leech like creatures.

    It is this slug / leech like stage which does the damage. They feed on the upper surfaces of the leaves with their black slime making them very unattractive to birds. The picture above shows the leaf damage very clearly, it is almost always restricted to the top surface of the leaf.

    The larvae feed for three to four weeks and then fall off onto the ground. They will then hatch into a second generation within the same year and it is this second generation which does the significant damage. This normally occurs in late August to mid September.

    In severe cases they can damage a huge amount of leaves. They are rarely fatal to the tree and fruit production is normally unaffected because the damage occurs so late in the year. They do make the leaves very unsightly however and can cause problems for already weak trees.

    Removing them by hand and disposing of them is one solution but the size of many fruit trees makes this a difficult task. They can be knocked off with a strong jet of water. Spraying with a contact insecticide such as Bifenthrin was the most common treatment but in the UK this insecticide is no longer permitted for amateur gardeners.

    Scotts Bug Clear is the recommended alternative but there is little hard evidence for how effective it is with the Pear Slug Sawfly.

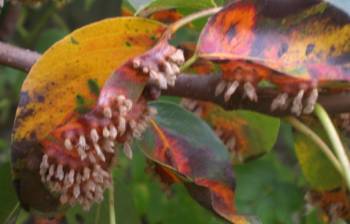
    EMERGING PEAR LEAVES HAVE SMALL GREEN / PINK / RED BLISTERS

    When the leaves start to form in spring they have tiny, slightly raised blisters on them which are normally a pink / green colour. As the leaves develop the blisters deepen in colour to dark red turning to black or deep brown. Some leaves may be totally unaffected but this is very variable. These leaf marks are caused by Pear Leaf Blister Mites.

    Pear Leaf Blister Mite
    Picture from Ontario Crop IPM

    The picture above shows the early stages of the mite infection. The marks will eventually turn to dark red / brown / black (see picture below). In advanced cases of this disease the fruit can also become deformed although this is unusual. Although the leaves can appear to be very damaged, fruit production is not significantly affected.

    Pear leaf blister mite - red / brown marks
    Copyright Notice
    Later stages of Pear Leaf Blister Mite

    HOW TO TREAT PEAR LEAF BLISTER MITES

    Once you notice damaged leaves it’s impossible kill the existing midges which because they are protected by the surface of the affected leaves. Treatment consists of limiting the damage in the current year and spraying in winter to prevent damage the next year. We recommend the following course of action:

    • Prompt action is essential to reduce damage in the current year. Pick off as many damaged leaves as possible to reduce the number of new mites – this pest has several lifecycles within a season. If the damage has been left until until the majority of leaves are affected then skip this step and continue to the next. Stripping off all the leaves will do more damage than good.
    • The weak point in the lifecycle (see below) of this mite is during the winter when the adults hibernate either very near the surface of buds or in the joints between bud and stem. Spraying with a winter tree wash (available online and at garden centres)  in November / December may well kill most of the mites.
    • The Pear Leaf Blister Mites are far more active on trees which are under stress. Lack of water is often at the root of the problem so water well in dry conditions. Apply a long-lasting fertiliser such as blood, fish and bone in March.

    LIFE CYCLE OF PEAR LEAF BLISTER MITES

    The diagram below is a graphical representation of the life cycle of the Pear Tree Blister Mite

    Lifecycle of Pear Leaf Blister Mite

    The following is a step by step description of the Pear Leaf Blister Mite life cycle. This pest has two or more generations of adults each year depending on weather conditions:

    1. Overwinter adults begin to burrow into developing leaf buds in spring when the weather warms up. They are roughly 0.20mm long and invisible to the naked eye.
    2. Each adult lays about 15 eggs which feed on the leaf tissue. This causes a blister to form which effectively protects from any chemical sprays.
    3. The centre of the blister breaks allowing mites in and out but in truth they move very little, they just feed!
    4. Normally there are three or so generations every year. The assumption is, although there is no proof, that the mites are spread from tree to tree by insects or birds.
    5. When the weather cools in September the adults seek out buds which will develop the next year. They overwinter at the base of the buds or just inside the first layer.

    HOLES IN FRUIT

    This section is courtesy of George Tondryk who spent hours examining video footage to determine the cause of holes in his pears. See the picture below for an example of the damage.

    Blue tit damage to pear fruits

    George sent me the relevant section of his video and it shows Blue Tits flying onto the fruits and pecking holes in them. Once the damage is done the holes may well have been enlarged by wasps and other insects but it’s clear from the video that the Blur Tits caused the initial damage.

    With bird damage there are only two solutions, either net the fruit or grow them in fruit cages. Nothing else that I am aware of will work.

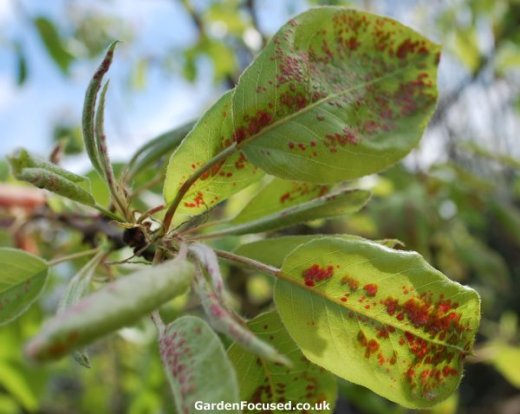
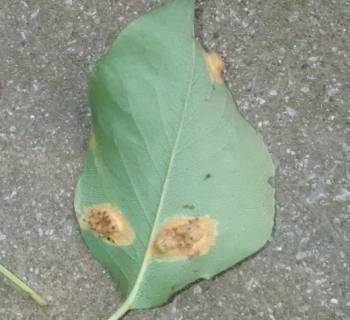
    ORANGE SPOTS ON LEAVES – PEAR RUST

    Where you see orange marks on the upper surface of the leaves combined with blisters and small growths on the lower surface this is a sure sign of Pear Rust. Less frequently it can cause smaller orange marks on the fruits. The Latin technical name for this fungal infection is Gymnosporangium sabinae.

    Pear rust, upperside of leaf
    Copyright notice
    Pear Rust on leaf top

    The picture above shows the upper side of a leaf infected with Pear Rust. If you turn the leaf over you will also see the blistering which looks almost like little caterpillar legs with black dots in the centre – see picture below.

     Under side of leaf with pear rust
    Copyright message
    Pear Rust on leaf underside

    The first point to note about pear rust is that there are no longer any chemical sprays available to UK gardeners to combat it. The two chemicals which were previously available have now been withdrawn. There are no pear tree varieties which are resistant to this infection

    The life cycle of pear rust can hold a cure to its control. In autumn, as the leaves of pear trees are dying, spores are released from the rust infection into the air. If they are to survive winter they must find another plant which retains its leaves over winter. The rust  spores in the UK have developed so that they are able to survive on juniper trees and bushes.

    Pear rust spores on underside of leaf (severe)
    Copyright message
    Severe case of Pear Rust

    When the spores land on the juniper leaves they over-winter and spores are then again released in May / June time which blow onto pear trees and re-infect them.

    One sure fire way to stop the infection spreading, and effectively kill it off, is to remove all juniper trees within a certain radius of the pear trees – half a mile should be more than sufficient. This is often not possible because the juniper bushes are growing on neighbour’s land.

    Other than the above there is no method currently available to eradicate pear rust. The only alternatives are to reduce the level of infection and / or keep the pear trees healthy enough to withstand the leaf damage.

    Where the infection is noticed early in the year, remove any leaves showing signs of damage which will help reduce the spread of the spores. If the tree is badly infected it’s best to leave the tree to its own devices. Removing large numbers of leaves will weaken it significantly.

    General care of your pear tree as explained here will help it survive an attack. Occasionally, where the attack is severe, damage will also occur to branches and will cause cankers. These can allow the spores to overwinter on the pear tree without the need for juniper trees. These cankers should be cut out as described here.

    Sometimes our readers ask specific questions which are not covered in the main article above. Our
    Pear tree pest and disease comment / question and answer page

    lists their comments, questions and answers. At the end of that page there is also a form for you to submit any new question or comment you have.