Care

By David Marks
Tomato plants are not complicated to grow well but they do benefit from regular care. Their first need is for regular watering in dry conditions. Without that they suffer from a variety of problems.Correct and regular feeding is key for the fruit to form well. They need different nutrients at different stages of their growth.Finally, pruning is key for cordon type tomato plants. Removing and pruning away dyeing and low-growing foliage benefits both cordon and bush tomato plants.

WATERING TOMATOES

Tomatoes need more water compared to most vegetables and at the same time they do not cope well with irregular watering which can cause several problems ranging from split skin to blossom end rot. One key rule when watering tomatoes is to water the soil not the plants. Keep tomatoes leaves as dry as possible to help avoid fungal diseases. Tomatoes growing in open ground will need watering whenever the top soil dries out. In warm weather they may need watering every two days and a good drench is the best solution. Tomatoes grown in grow bags require more frequent watering. Don’t let the compost dry out in a grow bag, it is very difficult to rehydrate it.

For all the tomato varieties which we have fully reviewed, click the drop down box below, select a variety and then click the More Information Button.

FEEDING TOMATOES

When tomato plants are initially planted in grow bags they will not require feeding for another three weeks because there are sufficient nutrients already in the compost. After that feed the tomato plants with a liquid tomato fertiliser at the rate suggested on the packaging up until early September. For tomato plants growing in open soil the feeding regime depends on the nutrients in the soil. With soils that have reasonable levels of nutrients in them a couple of applications of blood, fish and bone throughout the season is sufficient. For less nutrient rich soils an additional fortnightly feed with liquid tomato fertiliser will help lots of fruit form and mature well. Do this until early September.

In early September it’s best for for all tomato plants to change the feed to a balanced liquid fertiliser.

HOW TO GROW THE BEST TASTING TOMATOES?

This section is NOT about what tomato variety to grow it’s all about how to get the best
tasting tomato whichever variety you grow. Currently, science has not provided a complete answer to this question but there are some guidelines you can follow which will definitely improve the taste. Select those which you can easily provide.

MORE SUN EQUALS MORE TASTE

This does seem to be something about which the experts agree. Your number one priority when choosing a site for tomatoes is full sun. Sun provides the key energy source for growing new and large leaves and these increase not only the depth of flavour but also minor but very important flavour compounds which work their way into the tomatoes themselves.

LESS WATER EQUALS MORE TASTE

This is also something on which the experts agree. In independent tastings, tomato plants which had an excess of water available at the roots tasted blander compared to those which had less water. This is the key reason why supermarket tomatoes have less taste compared to home grown ones.

There is a dilemma however with this availability of water; too little water and your tomato plants will suffer or even die. The key to flavour enhancement is to provide them with just a little less water than they really need, but only just a little! Every site, growing method and variety requires a different amount of water so I can’t simply say your tomatoes need x litres a day to provide the maximum taste, it’s all a matter of experience.

The need to water regularly, albeit slightly less, is not reduced either. Irregular watering can cause blossom end rot and that renders them unusable. So regular watering but just a little less is one of the key methods of increasing tomato flavour.

When taste tests have been conducted in a scientific matter it appears that the effect of overwatering is noticeable in only a few hours. Tomato plants overwatered in the evening resulted in blander tomatoes the next day.

THE COMPOST / SOIL REALLY COUNTS

This is just as important as the above two sections. Most supermarket tomato plants are grown in near hydroponic conditions with very little contact with compost or real soil. If your compost contains basically a mixture of nitrogen, phosphorus and potassium / potash as provided by most garden plant feeds it is seriously lacking in a huge variety of micro-nutrients. It is these micro-nutrients which provide the majority of flavour in tomatoes.

Natural soil in good condition as found in your garden almost always supplies a good balance of these micro-nutrients and this is the best medium in which to grow your tomatoes if flavour is your key criteria. For the majority of people however, grow bags and containers are the most reliable method for growing tomatoes, if not only for the sake of convenience.

In practical terms, the best way to grow tomatoes for flavour is in open ground which has been dug to a fine tilth and with lots of well-rotted material incorporated into it. If space and / or convenience is at a premium and you want to grow your tomatoes in grow bags or containers then cut out a 20cm / 8in circle in the plastic at the base of the base of the grow bag. Dig the soil below where you intend to place the grow bag or bottomless container to a depth of 30cm / 1ft.

This practice will allow the roots of the tomato plant to grow to the bottom of the grow bag / bottomless container and into the soil below where there will be a wide range of micro-nutrients which will increase the flavour.

ARE TOMATO PLANTS SELF FERTILE?

All tomato plants are fully self-fertile which means even a single tomato plant, grown entirely on its own, will quite happily fertilise itself. Having said that though, some gardeners are strange folk and often believe that shaking a tomato plant very gently or tapping the support canes / strings when it is in flower will help the pollination process. Personally, I think the wind causes more than enough movement in the plants but no scientific tests have been conducted to prove or disprove the theory either way.

PRUNING TOMATOES

Pruning tomato plants can be a reasonably therapeutic task if you do it regularly, slightly more traumatic if you leave it August when the plants are bound to have become congested and the structure of the stems hidden by foliage. We have written a page dedicated to the subject of pruning tomato plants and it can be found here.

HARVESTING TOMATOES

There’s probably masses of information on the internet and in books on how best to harvest tomatoes but in reality the best way to harvest them is to wait until they look ripe, harvest and try them, eat them and if they are not quite ripe leave them another week.At the end of the season though, late September to early October you may well find that you have green tomatoes which simply will not ripen on the vine. Do not give up hope, harvest them before the frost gets to them and place them on a warm windowsill. In our experience several varieties ripen well under these conditions, Alicante and Gardener’s Delight are two we know.

MORE INFORMATION

We give below an article entitled “The Development of Tomato Root System in Relation to the Carbohydrate Status of the Whole Plant” published in 1997. It can be found by clicking here. This article is hard work to read and you will probably end up up realising how little you really know about growing tomatoes. However it will certainly cause you to question your current cultural methods and inspire experimentation.

COMMENTS / QUESTIONS LEFT BY OUR READERS

Sometimes our readers ask specific questions which are not covered in the main article above. Our
Outdoor Tomatoes comment / question and answer page
lists their comments, questions and answers. At the end of that page there is also a form for you to submit any new question or comment you have.

Care

By David Marks
Although sweetcorn is a rather exotic vegetable from South America, recent breeding programs have resulted in varieties which are well suited to growing in our cooler areas.

Their primary care needs are lots of sun and a regular supply of water. Provide those and you have satisfied most of their needs. Feed them every couple of weeks, keep them weed free and you will be approaching top quality conditions for a top quality sweetcorn crop.

WATERING, FEEDING AND CARE OF SWEET CORN

It’s vital to water the plants when they are young and the root system is not developed. However, contrary to common advice, established sweetcorn will look after themselves with minimal watering when they are established.

The key to reducing the need for watering is to apply a thick layer of mulch. We personally use about 5cm / 2in of wood chip because we have a good supply of that material. Alternatives include a layer of newspapers / cardboard topped up with grass cuttings or any rotted organic matter.

See our trial of the variety Sparrow during the extreme drought year of 2018 which can be seen here.
It’s surprising how often given advice, even from the very best sources, can prove to be not the whole truth.

Weeding is also important because weeds compete (and often win!) for water and nutrients in the soil. If you use a hoe be very careful not to damage the roots which appear near the soil surface.

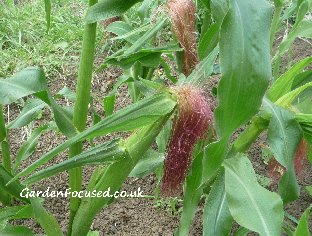
Male tassels on sweetcorn

Mulching with grass clippings, garden compost or similar materials will help greatly with retaining moisture in the soil and will also prevent weeds to a large degree.

When the seedlings are young they may be attacked by pigeons and similar birds. If birds are a problem in your area then laying horticultural fleece over the seedlings for a couple of weeks should protect them. After that stage the fleece can be removed because birds won’t attack larger seedlings.

Female silks on sweetcorn

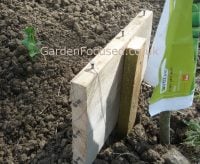
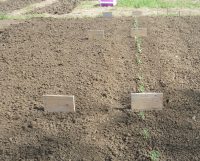
On our allotments this year we saw one gardener using a very effective and free method of bird protection. It consisted of smallish blocks of wood board place in the soil every three or four metres apart.

The blocks of wood board had a T piece nailed onto them to secure them in the soil. Nails were gently hammered into the edge of the boards (click the picture on the right to enlarge it and see more clearly).

Close up of homemade bird protection

They then take a reel of cotton (any colour) and weave the cotton across the wooden boards using the nails as guide points. So far this year this method has provided 100% protection against birds for sweetcorn, peas and onion sets.

It’s almost free bird prevention because the wood can be found almost anywhere with only a few nails and a reel of cotton needed to be bought. Let the plants grow through the cotton and only remove the wooden boards for storage at the end of the year.

Homemade bird protection

Sweetcorn does better if a good supply of nutrients are present in the soil. Ideally we would feed every fortnight with Growmore (nitrogen rich) fertiliser granules for the first two months and thereafter a tomato plant feed every couple of weeks up until harvesting.

Sweetcorn is a tall thin vegetable which is top heavy and can easily damaged by strong winds. To help prevent this we recommend drawing up the surrounding soil around the base of the stem so that the roots can grow into it and provide the plants with more support.

Often suckers will grow from near the base of the plant and it might appear that these are best removed. However, research to date indicates that this may well reduce the strength of the main plant so we suggest leaving the suckers alone to provide extra support.

HARVESTING SWEETCORN

Sweetcorn is unusual because the actual corns are surrounded with a green husk and not readily visible. Also, the actual kernels themselves quickly look like they are mature but in fact may well need a week or two more to achieve ripeness. The external colour of the kernels is not a guide to their ripeness.

In your area, the earliest that sweetcorn will be ready for harvest is the fourth week of July onwards but in many cases harvest time will be later. The timing is dependent on the weather through the growing season, when the sweetcorn were sown and the variety.

To test if sweetcorn is ready for harvest, gently separate the external green husk around halfway up the cob to expose a small number of the yellow kernels. Use your fingernail to pierce one of the kernels – if a watery liquid is present the sweetcorn is not ready yet, if the liquid looks milky then it’s ready, if the liquid is thick and pasty the cob is over ripe.

To harvest a cob, twist and bend it away from the main stem at the same time. You now have one of natures sweetest and tastiest vegetables, so read on for guidance about how to store sweet corn after it has been harvested!

Keep them cool is the rule. Harvest sweetcorn either in the morning or late afternoon when the temperatures are lower. To maintain the maximum sweetness store your sweetcorn in the coolest part of your fridge as soon as possible. Normal sweetcorn is best eaten immediately, extra tender sweetcorn will store in the fridge for about four days and extra sweet for one or two days longer. Although all are undoubtedly at their very best when eaten immediately after harvest.


Sometimes our readers ask specific questions which are not covered in the main article above. Our new
Sweetcorn comment / question and answer page
lists those comments, questions and answers. At the end of that page there is also a form for you to submit any new question or comment you have.

Care

By David Marks
Runner Beans are extremely easy to care for and make an ideal vegetable for novice and experienced gardeners to grow. Providing support for the runner beans to climb up is one of the primary tasks. Strange though it may seem, runner beans are programmed by nature to twist up poles, stems and similar items. They are not programmed to grow up netting and don't do very well when netting is their only support. When starting them off remember that they are also programmed to spiral up the poles in a clockwise direction (when viewed from below). If you try and twist them round support in the other direction they will try to untwist themselves!

SUPPORTING RUNNER BEANS

There is a rumour going round that what happens in the Northern Hemisphere (where the UK is) is not necessarily what happens in the Southern Hemisphere, for instance Australia, as far as runner beans are concerned. Well I can confirm from personal experience that runner beans twist and grow in exactly the same direction (clockwise when viewed from below) there as well. They do exactly the same wherever you are in world.

We described on the previous page some of the common shapes for supporting runner beans. In most cases the tendrils of the bean plants attach to bamboo canes of their own accord and entwine themselves around them. Occasionally they do need some help and gently tying them to the canes will do the job.

WATERING, FEEDING AND CARE OF RUNNER BEANS

Runner bean plants need lots of water, one look at the amount of foliage per plant will tell you that. If the weather becomes dry water them once a week with lots and lots of water. Weed around the base of the plant to reduce competition from weeds. In early July when the plants have established themselves a good mulch with well-rotted organic matter will conserve water, reduce weeds and provide some body to the soil when it is dug in at the end of the year. A layer of mulch 3cm / 1½ deep is not too much, 5cm / 2in is even better.

The actual runner beans will begin to appear late June to mid-July but this is very dependent on the variety grown, the weather conditions in your area of the UK and when you managed to plant them out. For example we live near Warwick, an area just slightly cooler than average in the UK, and the variety we grew was Lady Di. The first signs we saw of small runner beans was on on July 9th.

The next best thing you can do to your runner bean plant is to harvest very frequently. Many people end up with a glut of runner beans but it would be better if they picked the beans when they were immature, say about 17cm / 7in long.

This would reduce the harvest at any one point in time but the young beans are the tastiest of all and the time of harvest will be extended. The rule with runner beans is to pick them young even if you cannot eat them. Unused ones can be put on the compost heap.


Victoriana Nursery Runner Bean seeds

Harvest the beans using a pair of scissors to avoid damaging the stem by pulling on the plant. They will keep well in the fridge for a couple of days although are always best eaten on the day of harvest. Click here for some of our favourite recipes for runner beans.

NEXT PAGE – RECOMMENDED VARIETIES OF RUNNER BEANS

COMMENTS / QUESTIONS LEFT BY OUR READERS

Sometimes our readers ask specific questions which are not covered in the main article above. Our
Runner Bean comment / question and answer page
lists their comments, questions and answers. At the end of that page there is also a form for you to submit any new question or comment you have.
 

Care

By David Marks
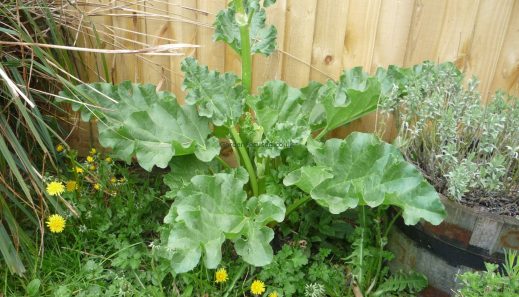
Rhubarb must be one of the strongest growing vegetables because if water logging is avoided it can survive in almost all positions and soils in the cool UK weather. See the picture below of a rhubarb plant which was in our garden when we moved in. Totally overrun with weeds it still stands out as a healthy looking plant with lots of juicy stems ready for picking. However, even just a little care will pay dividends with a slightly earlier crop and even more healthy stems. Follow our minimal care plan for rhubarb and you could be displaying the stalks at your local garden show!


WATERING, WEEDING AND FEEDING RHUBARB

If you grow your rhubarb in semi-shade and mulch (see below) each spring there should be almost no need for watering your rhubarb. In very prolonged and dry weather, or if your rhubarb is planted in full sun, the occasional thorough drenching with water will be all that is required.

We regularly weed around our rhubarb (see below for an example of how not to grow rhubarb) and this is a good idea because once weeds start growing around the base of the plant they are very difficult to remove.


Rhubarb doing well even in weedy conditions

Feeding in Spring and Autumn with a long lasting organic fertiliser such as blood, fish and bone or bonemeal (two good handfuls sprinkled around each plant) will be sufficient. If you have any well rotted manure then spread a layer around the plant but far enough away so as not to touch any emerging stalks.

Suttons seeds

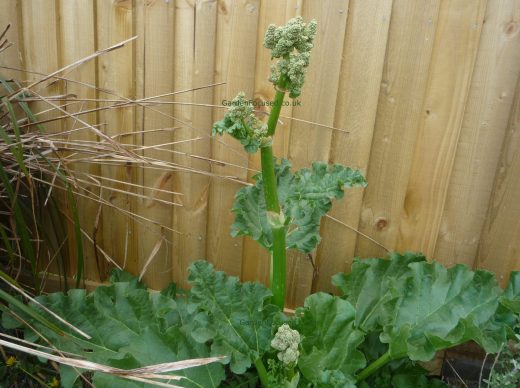
Frequently, rhubarb plants will produce flower heads (click the picture below to see one clearly) and these are best removed by simply cutting the stem below them.


Flowering rhubarb plant

Mulching your plants in spring around the second week of May will conserve moisture in the soil and also help to prevent the growth of weeds. In winter when the plant has stopped growing, remove the remaining stalks and leaves and put them on the compost heap.

FORCING RHUBARB

Forcing rhubarb is a troublesome procedure which gives you fresh rhubarb about three weeks earlier compared to normal  rhubarb. It requires you to go out in the freezing cold of February and tend to your rhubarb to force it to produce a crop far earlier than it would normally. Who on earth would do do that you may ask, why not wait three weeks longer for the normal crop? But gardeners are strange and competitive individuals who just love to get one up on their neighbouring gardeners.

If that’s sold to you the benefits of forcing rhubarb then here’s what you must do. When your plant begins to show signs of life (normally end of January to early February), cover it with something which traps in warmth and excludes light – a large bucket will do or maybe, if money is no object, a purpose made rhubarb forcing pot which will be available at most garden centres. Cover the container with straw, compost or anything which will keep the warmth within.

Keep a watch on the rhubarb every week or so and you will find that within three to four weeks of placing the cover on top you will have a crop of delicate and sweet stalks. This process weakens the plant so leave a forced rhubarb for two to three years before forcing it again.

HOW TO HARVEST RHUBARB

First, what not to do! Don’t harvest rhubarb in the first year of its life and go easy during the second year. The reason is that the plant will be building up its strength and removing the stalks will also remove the leaves – these are its source of strength. Next, don’t eat the leaves because they contain oxalic acid which is poisonous.

Aside from that you are safe to do what you want with your rhubarb plant but leave at least six or so stalks remaining. To harvest individual stalks don’t cut them off, this can introduce infection. The best way is to grip a stalk near the the base, twist slightly and pull outwards in one motion.

Harvest in your area normally begins in the. the second week of March Our advice would be to continue harvesting for three more months. This will then allow the plant to recover for more harvests next year. However, if the plant looks healthy and has lots of stalks then harvesting for four months is fine.

HOW TO OVER-WINTER RHUBARB

Rhubarb originates from the hugely cold area, Serbia in Russia. No winter weather in the UK is going to ever cause a significant problem to a rhubarb plant. Covering the crown to protect it from frost is pointless in most cases, it increases the risk of fungal infections by trapping in moisture.

For an established rhubarb plant in the ground, do nothing other than clear up fallen stems and leaves. They do not need any winter protection at all. In fact they grow best when the crown is left exposed to whatever our UK weather can throw at them.

For a rhubarb plant which has been planted in the current year, in winter I would cover the crown very lightly with bracken or shrub prunings. Don’t cover with much, you don’t want to trap in moisture and risk rotting the crown. If in doubt, do nothing.

If you have a rhubarb plant in a pot or container, it is very unlikely to be damaged by a UK winter. However, I would move it to a position protected from the worst winds, ideally next to a house wall. Again, if in doubt, do nothing, just clear away fallen stems and leaves as they die off.

COMMENTS / QUESTIONS LEFT BY OUR READERS

Sometimes our readers ask specific questions which are not covered in the main article above. Our
Rhubarb comment / question and answer page
lists their comments, questions and answers. At the end of that page there is also a form for you to submit any new question or comment you have.

Care

By David Marks
Fuchsias have three key needs if they are to be healthy and produce lots of flowers, each one is described in detail in this article:

  • Water so that the soil is moist but not water-logged
  • A regular supply of nutrients
  • Pruning / pinching out to ensure they produce lots of flowers and maintain a good shape.

PINCHING OUT BUSH AND TRAILING FUCHSIAS

If a fuchsia is left to its own devices it will grow into a long-stemmed plant with no particular shape. It will also produce far less flowers compared to one which has been cared for. Pinching out the growing tips regularly during the initial stage of growth ensures that the stems have lots of side shoots. This will encourage the plant to form a mound shape and the maximum number of flowers.

We have written an in depth article, with several helpful close up pictures, on why, when and how to pinch out fuchsias, which can be found by clicking here.

GROWING FUCHSIAS IN CONTAINERS

As any fuchsia grows in a container it will need to be potted up two or three times into a larger container to allow the roots to expand and the plant to reach its maximum potential. In general it will need potting up form its original small pot after about four weeks, then another six weeks later and then into its final pot another six weeks later. You can tell when the plant is ready for potting up by tipping it out of the pot and looking at the root ball, if there are lots of roots at the edges then its time to pot up. When you do this take a good look at the root ball for signs of the dreaded vine weevil!

Fuchsias do not like frost and young plants will be killed if they are exposed to it. The same goes for shop bought fuchsias because they have been grown in temperature controlled conditions. During cold months they need to be kept out of the cold. When warmer weather begins they should be exposed to outside conditions in phases to avoid shocking them. Initially place them outside during the day and gradually increase the period they re outside over a two week period.

Fuchsias do not grow well in dry conditions, they prefer their roots to be in moist but not water-logged compost. The larger the container the less often it will require watering. The basic rule we use for testing if a plant needs watering is to stick a finger in the top 3cm of the soil, if it’s dry all the way down then it needs watering.

As far as plant foods for fuchsias are concerned we use liquid feeds at the rate stated on whatever pack we buy. When the plant is growing and has no buds on it we feed with a balanced nitrogen fertiliser. When the flower buds start to appear we swap to a tomato fertiliser.

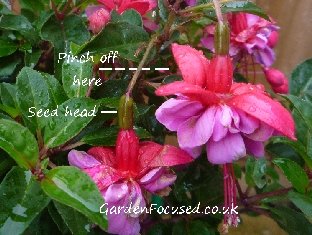
When the flowers appear they come in flushes, not all at once. As soon as a flower starts to look past its best pinch it off including the seed head behind it. If the seed heads are left on the plant they will sap energy from the plant and also convince the plant that producing more flowers is not needed. Some fuchsias have been bred to drop their flowers and seed heads of their own accord.

Where to pinch off flowers and seed pods on a fuchsia

Fuchsias grow best in semi-shade although full sun can be tolerated as long as the compost is kept moist. Full sun will definitely cause the colours in the flowers to prematurely fade.

If you are growing fuchsias from cuttings or plug plants we have created a step by step growing calendar itemising each step in the process. The dates given in the calendar are average for the UK and Ireland but can be very easily auto-adjusted to your particular area, Click here to go to the calendar page.

GO ON TO LEARN ABOUT FUCHSIA
PESTS AND DISEASES


CALENDAR

TAKING CUTTINGS

PINCHING OUT

FUCHSIA CARE

PEST, DISEASE

STANDARD FUCHSIAS

OVER-WINTER

COMMENTS / QUESTIONS LEFT BY OUR READERS

Date: n/a From: Awaiting your comments
Awaiting reader questions / comments

WHY NOT LEAVE YOUR QUESTION / COMMENTS ABOUT THIS PAGE?
ENTER THEM BELOW. EMAIL ADDRESS IS OPTIONAL.
YOUR COMMENTS WILL BE ADDED ABOVE WITHIN A FEW HOURS.

    Your email address (optional),
    I will email you when town is added:

    Your Name (optional):
    Your Town:


    Care

    HOW TO CARE FOR LETTUCE IN THE UK

    By David Marks
    When your lettuce seedlings emerge they should be thinned to the correct distance apart to ensure they can grow to their full size without over-crowding.

    Aside from that they need little care other than weeding, a little feeding and lots of water in dry conditions.

    If you harvest lettuce regularly you will not only have a crop over a longer time but you will also be able to re-plant in the same position for even more crops.

    THINNING OUT LETTUCE

    The ideal situation when thinning lettuce is to let them grow just large enough so that the thinnings can be used in salads and sandwiches – young baby lettuce really is delicious. Initially when the seedling emerge thin to about 15cm / 6in apart. Let the lettuce grow until the leaves start to touch and then thin to their final distance apart of 30cm / 12in. Smaller lettuce such as Tom Thumb can be grow at slightly less distance apart. The second thinnings are ideal as baby lettuce.

    Lettuce are very prone to attack by slugs and snails with the tiny seedlings being especially vulnerable. See our page on lettuce pest and diseases here.

    WATERING AND FEEDING LETTUCE

    Lettuce aren't heavy feeders but a good handful of blood, fish and bone worked into the top soil every square metre / yard will give them all the nutrients they need. However, what lettuce really do appreciate is regular watering in dry and warm conditions. They need water not only to swell their leaves but also to cool the soil in warm conditions. As with all vegetables, regular weeding is needed to stop them competing for moisture and soil nutrients

    HARVESTING LETTUCE

    Lettuce never keeps for long after harvest, it's best eaten on the same day. Supermarket lettuce and especially those bags of lettuce leaves are highly treated with chemicals such as chlorine to extend their life.

    Unfortunately they never taste so good as home-grown lettuce and they certainly contain many chemical and pesticide residues. So don't be disappointed if your lettuce keeps for a day or so at most in the fridge, that's because you have grown and harvested a natural product without the aid of sprays and chemicals.

    How much you harvest at a time depends entirely on how much you need. All lettuces respond well to having the outer leaves harvested, it encourages more growth later on. If you want to harvest a whole lettuce take hold of the lettuce at its base and gently tease the roots from the soil. Lettuce will store better if the base stem is left on the plant. Store lettuce in the fridge but don't freeze.

    Don't leave lettuce in the ground too long because it will start to set seed (a process known as bolting) and this will make the leaves taste bitter. Harvest when young and tender is the rule. When you have harvested a few of your lettuce it's quite possible to sow more seeds in the same place for a crop later on.

    Care

    By David Marks
    If French Beans have the correct soil conditions and a fair dose of sun they are a relatively easy crop to
    care for. Watering, feeding and weeding are the main tasks.

    Many vegetables are difficult to store over extended periods of time but French Beans freeze better compared to most other vegetables.

    The seeds can also be allowed to grow to varying degrees of maturity and then stored dry in airtight containers. Flageolet, haricot, navy beans are names for the mature seeds of French beans. Of course, the seeds can also be used to grow next year’s crop.

    SUPPORTING CLIMBING FRENCH BEANS

    Climbing French Beans will need support very soon after they are planted or sown. The height of the support should be around 2m / 6ft high. The most common form of support is simply wire netting strung between bamboo canes. Wigwam supports are also common and look very attractive.

    Whatever support is used the climbing beans should be tied into the support every 20cm / 8in or so. When the climbing beans reach the top of the support pinch out the growing tip of the plant to stop it growing taller – this will also help the beans to bush out and start producing beans.

    WATERING, FEEDING AND CARE OF FRENCH BEANS

    French beans need lots of moisture especially when the pods are forming. They are surprising plants though because their roots go down further than you might imagine for such a delicate plant and they form a large fibrous mass which is good at extracting water from the soil. Even so, when the weather becomes dry they need watering.

    As far as feeding goes add a handful of fish, blood and bone fertiliser in mid-June. If you want to apply any liquid fertiliser then tomato feed every fortnight is best, this will help the plants to crop well but is not essential.

    Dwarf varieties of French Beans are often thought to be self-supporting and to some degree this is correct. However, often the weight of the pods drags the plants to the ground or sideways. We recommend placing twigs around  the plants to provide a small degree of support.

    Raspberry bush prunings are ideal for this purpose and they last a couple of years. Any twigs though will give the dwarf French Beans just that little bit of extra support they need.

    HARVESTING FRENCH BEANS

    Towards the end of July keep an eye on your French Bean plants to see how the beans are developing. Most people are surprised at how large the crop is so begin harvesting when the bean pods are very young. This will extend the cropping period, encourage new beans to develop, and make use of the beans when they are young and at their most tender.

    If you let a few plants produce the beans to maturity (mid-September time) you will be able to eat your own haricot beans which can be kept throughout the winter to consume when few other vegetables are available.

    Haricot beans are also known as Navy beans because the US Navy used them for food in the early 1900s. They did this for very good reasons, haricot beans are very cheap but also highly nutritious and contain many trace elements and a good amount of vitamin B1.

    Harvest when French Beans are young and tender and use a knife or scissors to separate them from the plant – pulling them off the plant often results in damage. Store in the fridge but eat as soon as possible for the best taste and texture. Harvest frequently to ensure the plants continue to crop and only freeze the young and tender French Beans.

    To produce haricot beans don’t harvest early, instead let the plant grow until mid-September, at this time the beans will be almost popping out of their pods! Cut the main plant stem and place the entire plant indoors to dry out. Hanging the plants from string works well.

    After a few days, when the pods are dried out, shell the haricot beans. Store in an airtight container in a cool and dark place. The beans will keep for 12 months. When cooking them, they will need to be soaked overnight before adding to any recipes.

    Care

    By David Marks
    Watering is essential for a good crop of cucumbers if conditions become dry, weeding will also reduce water loss and competition for soil nutrients. You can erect mini-supports for ridge cucumbers but it’s not needed at all. Just let them grow where they want and they will do fine.A two-weekly feed with abalanced fertiliser such as Growmore will help them along nicely. Some gardeners
    mistakenly believe that, because the cucumber is fruit (it really is!), it does better if fed on a tomato type fertiliser which is higher in potassium than a balanced fertiliser but this is not the case.

    Indeed, it is a misconception that fruit producing plants in general need large amounts of potassium. For example apples, plums, peaches, pears, cherries and several other fruit producing plants require more nitrogen than they do potassium but in the case of tomatoes they require a higher percentage of potassium.

    Cucumbers need high levels of nutrients to produce of their very best and nitrogen is as important to them as other elements. Our experience has backed this up as well and we have researched what other informed and practiced organisations say about this matter.

    Aside from the more commercial websites, some of whom have never grown their own cucumbers, we refer you to the following three well respected sites on this subject to back up our feeding recommendations:

    • The RHS website who recommend “rake in 100g per square metre (3½ oz per 10¾ sq ft) of general purpose fertiliser” and later on “feed every 10-14 days with a balanced liquid fertiliser”
    • The University of Illinois who recommend the following “side-dress with nitrogen fertilizer when the plants begin to vine”
    • Cornell University who recommend “Cucumbers are heavy feeders and require fertile soil, nitrogen fertilizer, and/or additions of high-N organic matter sources.”

    A mulch on the surrounding soil (but not touching the main stem) will conserve water and discourage weeds.
    A small amount of pruning will encourage the early formation of outdoor cucumbers. The main stem will grow quickly once the plant is established  – when it has grown eight sets of leaves pinch out the end of
    the stem. This will force the plant to put growth into the side stems and this is where your cucumbers will form later on..The date given in the calendar at the top of this page for pruning is very approximate so keep a watch out for the formation of those leaves.

    In general, the rule with outdoor ridge cucumbers is not to remove any of the flowers – both male and female flowers are needed for pollination with the help of bees. However recent advances in the varieties available include a couple of so called ridge cucumbers where the difference between them and greenhouse varieties has becoming blurred. Our advice is to read the seed packet instructions carefully just in case some flower removal is recommended.

    WHEN TO HARVEST YOUR OUTDOOR RIDGE CUCUMBRS

    The calendar at the top of this page gives an approximate date when you can expect harvest your ridge cucumbers but in reality, the best indicator of when to harvest is the size of the growing cucumbers. When they reach a length of 20 cm or so they are probably ready to harvest. Different varieties may differ slightly so read the instructions on the seed packet.

    RECOMMENDED VARIETIES OF OUTDOOR RIDGE CUCUMBERS

    There are several varieties of outdoor cucumbers available to the UK gardener from the established to the more modern varieties. Our review page has details of them all with their positive and negative points. Click here for an independent and unbiased review of the varieties available.

    PESTS AND DISEASES OF RIDGE CUCUMBERS

    In our experience only two pests are a problem for ridge cucumbers. First and most likely are aphids, and the second is slugs and snails.

    END OF ARTICLE

    BACK TO MAIN VEGETABLE PAGE

    Care

    By David Marks
    Our previous page on Brussels Sprouts showed you how to sow Brussels Sprouts in the soil and the position where they will grow best. It also showed our unique Brussels Sprouts care calendar. This page shows you how and when to transplant your seedlings and why they appreciate being transplanted. Ongoing care and harvesting are also discussed in detail.

    TRANSPLANTING BRUSSEL SPROUTS

    Before doing any transplanting, prepare the soil where the Brussels Sprouts are to grow for the rest of the year. We have described how to do much of this in the previous page and the key requirement is for a firm soil to support the tall plants.

    If your soil is on the clay side then we suggest that no further action is required at this point. However if your soil is on the light side then a small amount of compaction will pay off later. To do this simply walk over the surface of the soil (sounds wrong I know, but good for Brussels Sprouts) to compact it slightly. No jumping up and down mind you, just a gentle walk!

    The idea that transplanting your Brussels Sprouts plants improves their health may sound a bit far-fetched to those of you who have not tried it before.

    So, for first-timers we suggest that you transplant most of your plants from the seed bed to their final position but leave some, at the correct spacing, in the seed bed for the remainder of the season. Then you will be able to compare the transplant method with the sow in place method. I’m sure you’ll find the transplant method works out best.

    Transplant Brussels Sprouts seedlings around the last week of May when they are 13cm / 5in high. This simply involves digging up the young plants and replanting them in their new positions at the correct distance apart.

    See here for using cabbage root fly discs prior to transplanting. If you did use them, clean them up and put in place again after transplanting. If you didn’t use them then consider using them now to stop second and third generation eggs of cabbage root fly being laid near the plant.

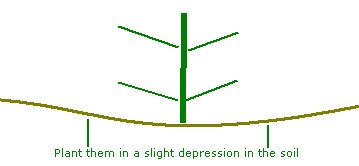
    Plants should be spaced 50cm / 20in apart with rows 70cm / 2ft 4in apart. The transplants should be to a depth so that their lowest set of leaves are touching the ground. If your site suffers from strong winds we recommend that you transplant into a shallowed out area in the soil. See the picture below which shows exactly what we mean.

    Transplants into depression in the soil

    The slight dip in the soil has the advantage that as the plant grows it can be filled in with soil which will provide greater area for the roots to grow into and provide more stability for the plant.

    WATERING, FEEDING AND CARE OF BRUSSELS SPROUTS

    Watering during dry periods is essential for good sprouts. As always its best to apply lots of water infrequently rather than lots of small amounts which would only encourage root growth near the surface.

    Brussels Sprouts are large plants with lots of greenery so they need to be fed regularly. Monthly applications of fish, blood and bone at the rate of a good handful per square metre will feed them well. An additional nitrogen rich feed (Growmore or similar) in mid August will help encourage good sprout formation and strong plants.

    A mulch with organic material is excellent for Brussels Sprouts. But before applying it, draw the soil up around the base of the plant (including filling in the dip in the soil) and pat it down well. Now add lots of water round the base of the plants and then apply the mulch.

    Material from the compost heap will do the job fine but if you don’t have any, grass cuttings firmed down on the soil will make an excellent mulch. A layer of around 8cm / 3in will kill most weeds and stop any new ones growing, it will also conserve water.

    HOW TO HARVEST BRUSSELS SPROUTS

    Early varieties of Brussels Sprouts can be ready for harvest in early November and the late varieties will last until early March.

    Theres a whole pile of advice about harvesting Brussels Sprouts but in reality harvest them when they look big enough to eat. Don’t leave them on the stem too long because the may well become too leafy.

    In general the sprouts lower down the stem are ready first and it is best to harvest theses first which will
    encourage the production and ripening of those higher up the stem.

    The question is often asked what size the sprouts should be when harvesting. We reckon that a sprout diameter of 4cm / 1½in is the optimum size for tasty, firm sprouts and getting a reasonable harvest. Much larger than that size and you run the danger of the sprouts “blowing” (becoming loose and bitter).

    As you harvest the sprouts, cut off any yellowing leaves near the base of the plant. Leaving dead leaves on only encourages pests and diseases. The green leaves at the top of the plant can be cut off when about two thirds of the sprouts have been harvested and used as spring greens.

    Many people love the taste of fresh greens from the tops of of Brussels sprouts. When you do harvest the tops though be aware that this will hasten the ripening of the sprouts below.

    When harvesting is complete the main stem should be dug up (not pulled out), chopped up and can then go on the compost heap. We cut off and burn the roots to reduce the risk of introducing club root into the compost heap. Don’t just pull up the the main stem because this can leave portions of it underground again increasing the risk of club root. Dig them up don’t pull them up is the rule.

    Brussels Sprouts in flower
    Brussels Sprouts in flower during late May

    An alternative to digging all the plants up is to leave some of the in the ground as a small clump. As the picture above shows, they will flower in May and produce spectacular yellow flowers.

    NEXT PAGE – PESTS AND DISEASES OF BRUSSELS SPROUTS

    Care

    By David Marks

    Beetroot are one of the easiest vegetables to care for, simply keep the area weeded and water if conditions become very dry.

    When water is needed, gives lots of it infrequently rather than watering a little and often. The seeds take about two to three weeks to emerge after sowing. From sowing to harvesting as a golf ball size beetroot takes about three months.

    The only other care needed is to thin out the seedlings to avoid overcrowding. This is best done in two goes with the first thinning occurring when the seedlings have grown to about 1½cm / ½in tall. With beetroot seed each “seed pod” may actually three or four seeds and therefore two or thee seedlings are quite likely to emerge from each “seed pod”. Thin the seedlings to 2cm (¾in) apart.

    The timing of the second thinning is rather variable. We thin our beetroot for the second time when the plants are about 8cm / 3in high because at this stage the thinned plants will have micro beetroot roots which are deliciously sweet to eat. Whenever you thin them, leave the remaining beetroot 10cm / 4in apart.

    WHEN TO HARVEST YOUR BEETROOT

    If you want fully grown beetroot then harvest them when the root is slightly larger than a golf ball which will be some time around the fourth week of July in the UK. For the sweetest and most delicious though, harvest them a week or so before that when they are the size of a golf ball or slightly smaller.

    To harvest them grip the foliage as near to the beetroot root as possible and gently tease it from the soil. Harvesting is easiest when the soil is slightly damp.


    Beetroot ready for harvest

    The leaves are edible and excellent for bringing colour to a salad or as a spinach alternative. The tastiest leaves are the young ones, leaves from fully grown beetroot can taste slightly bitter.

    HOW TO STORE BEETROOT

    Beetroot is a very popular vegetable in Eastern Europe because it can withstand a few degrees of frost when left in the ground with no damage being done. This extends the vegetable season in some cold (and relatively poor ountries) by three or four weeks.

    I lived in Moscow for six months several years ago and became interested in how they preserve their root vegetables for winter consumption. After all, some of the people in countries with cold winters depend on vegetables for their very life during winter – a serious matter for them.

    What I learnt is this, yes, beetroot harvested before a hard frost occurs can be stored for three or four months. In this way it can be a valuable source of food. But it never tastes anywhere near as good as beetroot harvested fresh from the ground when young and tender. If you accept that, then read on. If you want some airy, fairy stories about how beetroot can be stored in perfect condition throughout the winter then look elsewhere.

    The very best way to store beetroot is to trim the top stalk to about 3cm making sure to remove any leaves. Don’t trim the root end at all. When you pull the beetroot from the ground shake off any excess earth but never wash them clean. They may look better washed but they store far better slightly muddy.

    If there is any sun still remaining then lie them exposed to the sun for 12 to 24 hours. If sunshine is not available then leave them for 12 hours in a cool room. This will slightly harden the skin and prevent water
    evaporation during storage.

    Line the base of of a plastic box with 2cm of multipurpose compost or sand, both are fine. Only use wood boxes if you are sure that mice and other rodents won’t have access to your crop in storage. Place the beetroot in the box so they are not touching each other.

    Cover the bottom layer of beetroot with 2cm of compost / sand and repeat. You may well be able to get three layers (but no more) if the box is high enough.

    Store the boxes in a dark and cool but frost free place. The ideal temperature is about 34°F although this is rarely achievable in the UK. Your beetroot should remain edible in these conditions for about three months.

    Don’t be under any illusions, it will not taste perfect if eaten as you would a fresh beetroot but it will still be very edible. In Russia and other neighbouring countries they get round this lack of “fresh from the ground” taste and texture by using the stored beetroots in hearty stews and soups.

    Borscht using stored beetroots
    Borscht with stored beetroot

    Borscht is the most well known example of how to use stored beetroot to best effect. It makes a truly delicious meal and all the slightly stringy texture of stored beetroot is lost. Learn from those who depend on this food for their survival and don’t believe too much in book and website articles promising you perfect beetroot after several months storage.

    COMMENTS / QUESTIONS LEFT BY OUR READERS

    Sometimes our readers ask specific questions which are not covered in the main article above. Our Beetroot comment / question and answer page lists their comments,
    questions and answers. At the end of that page there is also a form for you to submit any new question or comment you have.

    BACK TO MAIN VEGETABLE PAGE

    Care

    By David Marks
    We explain the simple process of planting a pear tree and, if necessary, how to attach a stake to support it.

    Pear trees grow on almost all soils from sandy to clay and with our easy to understand annual care guide we explain how best to look after your tree(s) and the best times to do it. Watering, feeding, thinning fruit to ensure a good crop, how and when to harvest, are all explained in detail.

    PLANTING A NEW PEAR TREE

    Planting a pear tree is a relatively simple matter but we suggest you consider the following points before going ahead. Each of them is explored in a little more detail below.

    • Equipment required for planting – get it all ready before you start planting your tree.
    • When your pear tree arrives – get it planted as soon as possible (both bare rooted and pot grown) but don’t plant in freezing or very wet weather.
    • Soil conditions – pear trees are tolerant of soil conditions but they prefer a free draining, rich soil so some preparation will repay you in the future.
    • Position – In full sun as far as possible and out of the way of strong winds. Avoid frost-pockets and if you can’t then pick your variety of pear tree carefully. Pear trees like moist soil but will not survive in water-logged ground so make sure you choose a position where water does not gather, especially in winter.
    • Spacing – one of the easiest mistakes to make and one of the easiest to avoid is to get the spacing correct from nearby plants and trees.
    • Protect from animal damage – rabbits, hares and deer can all strip the bark from your new tree in a matter of a couple of days so provide protection for vulnerable new bark when you plant a tree, see equipment required below.

    EQUIPMENT REQUIRED

    Before your tree arrives have the following equipment ready for planting it:

    • A fork to dig out the planting hole.
    • A support post and a plastic / rubber spacer tie specially designed to attach newly planted trees to your support post. The support post should be reasonably strong (about 8cm / 3in) wide and about 150cm / 5ft high.
    • A heavy hammer or something similar to bang the post into the ground.
    • For bare-rooted trees, a bucket full of water.
    • Preferably a mulch to place around the tree when it is planted. This can be well rotted compost, bark chip or wood chip. A black plastic mulch can also be used, although make lots of holes in it to allow rain water to easily pass through the surface into the soil below.
    • Two people make the job easier and quicker although it’s perfectly possible for one person to plant a young tree successfully.
    • Some form of protection against rabbits and other animals for the lower part of the main stem. Never assume that rabbit proof fencing will protect your fruit trees! In winter when snow lies on the ground, rabbits become desperate for food and no fencing I know of is good enough to keep out a starving rabbit. For ideas on protective measures see this page here. Some are a bit extreme but it will give you ideas.

    WHEN YOUR PEAR TREE ARRIVES

    If you have more than one tree to plant then ensure that each tree is labelled to show which variety it is. Nothing is more annoying than having three or so fruit trees arrive then unpacking them only to find out that you can’t tell which is which! Remember, one young pear tree looks much the same as any other fruit tree.

    Bare-rooted pear trees need to be planted as soon as possible after they arrive or when you bring them home. With container grown pear trees time is not quite so crucial but it’s definitely best to plant them as soon as possible. Plant on a frost-free day and when the soil is not frozen from previous cold weather. Don’t plant when the soil is very wet.

    The British weather however is not always reliable and you may need to store your new tree for a week or so until the weather conditions are suitable. If you need to delay planting a bare-rooted tree then you will need to heel it in immediately it arrives until the weather is correct for planting. The principle behind “heeling in” is simple – get the tree into temporary soil which is moist and not frozen solid and store it there until the time is right.

    Although the pear tree retailers almost insist on planting their trees immediately they arrive, and this is most definitely the best idea, heeling in is a well-established practice which will keep a bare-rooted tree in very good condition for at least a week and often more. The best way to heel in a  young tree is to dig a hole in some well dug soil adding lots of compost to break up the soil and warm it if frozen. Then place the roots of the tree into the hole and cover with the dug soil / compost. The roots should be covered completely with the soil.

    It’s not even absolutely essential to keep the tree upright, it can be on its side, slightly pointed upwards with a support to keep it off the ground, just make sure that the roots are well covered with firmed down moist soil. Water the soil well and make sure the tree is well-supported. Later when you are ready to plant it permanently remove the top soil with your hands and gently tease it out from the remaining soil.

    If you need to store a container grown tree then make sure the soil in the pot is moist and store it out of direct sunlight and away from strong winds. Against the outside walls of a heated house or in an unheated greenhouse is probably the best place.

    NEVER STORE A BARE-ROOTED OR CONTAINER GROWN TREE INDOORS! The conditions inside a house will dry the tree out faster than you can say “I love pears”!

    POSITION

    A very common problem when planting pear trees is to position them too near other trees or plants. This sometimes only becomes obvious three or four years later when your tree is well established and very difficult to move. The size of a pear tree depends on four factors:

    • The rootstock is in most cases the key factor to the final size (height and spread) of your pear tree.
    • The variety of pear tree. In most cases, varieties grow to approximately the same size but there are a some which are well known to grow larger compared to others on the same rootstock. For example perry pear trees tend to grow larger than average. Read up about any varieties you plan to plant and note if they tend to grow larger than normal and adjust the spacing around it accordingly.
    • Growing conditions can affect the eventual size of your tree. In poor conditions, sandy and / or poor levels of nutrition, they well turn out to be a slightly smaller tree compared to one grown in substantial soil with high levels of nutrients.
    • Pruning obviously affects the size of a tree. Regular pruning designed to reduce the eventual size of a pear tree can keep its size to about three-quarters of a normally pruned tree. Remember though that pruning of this type needs to repeated for ever. If you forget to prune well for a year or two the tree will simply grow back to its normal size.

    Established pear trees are more than able to cope with planting of bedding plants and other shallow rooted plants near their base. However don’t plant other pear trees, shrubs or deep rooted plants in the same area. As a rule of thumb leave a pear tree about one and a half times its maximum spread clear of other deep rooted plants. The supplier of your tree should be able to give you a good idea of its maximum spread.

    If this information is not forthcoming then some guesswork is required and you will only ever be able roughly estimate the space required. If you know the rootstock then a good estimate for spacing between other trees / large shrubs would be:

    • Quince C rootstock – allow at least 3m (10ft) between trees
    • Quince A rootstock – allow at least 3.5m (11ft) between trees
    • Pyrodwarf rootstock – allow at least 4.5m (15ft) between trees
    • Pyrus communis rootstock – allow at least 7m (23ft) between trees.

    Note that the above are the distances between one tree trunk and the other, not the distance required between the final overall spread of the trees.

    PROTECT FROM ANIMAL DAMAGE

    Young tree bark is very attractive to rabbits, hares and deer to name but a few animals. If you live in an urban area, deer are unlikely to be a problem but in more exposed situations they can kill a young tree overnight.

    Rabbits and hares are the easiest threat to deal with. Buy spiral tree guards and place them round the base of the tree trunk to protect from rabbits and hares. Remove the guards after a couple of years when the bark will have become hardened and unattractive to rabbits and hares.

    To protect from deer damage you need to erect fencing / wire-mesh around the tree to prevent them getting anywhere near it. Do this immediately after planting if you have any suspicion that deer may be a problem.

    HOW TO PLANT

    Before you start to dig the planting hole make sure your tree is fully hydrated. If it’s a bare rooted tree then place the roots in a bucket of water while you dig the hole. If it’s a container grown tree then water the container well before digging the hole.

    Dig a hole which is slightly wider than the container or two to three times as wide as the bare-roots ball and deep enough to take either so that the tree is to the same depth in the container or as it was, if bare-rooted, at the nursery. Bare-rooted trees will have a soil mark near the base of the trunk showing how deep they were planted.

    For container grown trees remove the tree from the container disturbing the roots as little as possible. Place the tree in the dug hole and and check that the surrounding soil will be at the same level as the soil in the container – add or remove soil as required to achieve the correct height. Fill in the hole with soil firming it down as you go. Don’t apply too much pressure on the soil, just enough to ensure that any air gaps are filled with soil.

    The same idea applies to bare-rooted trees but spread out the roots into the hole before adding soil. Place the tree to the correct depth in the hole (two people make this a lot easier) and gradually sprinkle on soil gently firming it down as more soil is added.

    Finally water the soil around the tree very well. We recommend applying a mulch around the base of your pear tree but leave a gap of 3cm / 1 in or so of clear soil around the base of the trunk so that the mulch is not touching it. A mulch depth of 8cm / 3in and a spread of 1 metre / yard should be fine. It’s best to mulch a new pear tree after watering it and after the support stake has been put in place (see below, Supporting a New Pear Tree).

    SUPPORTING A NEW PEAR TREE

    Newly planted pear trees require support for the first couple of years until their roots are strong enough to support them. Some require support throughout their life, it all depends on the rootstock used. The more vigorous rootstocks require only two years support and by far the most common of these are Pyrodwarf and Pyrus communis in the UK.

    It’s interesting to note that a one year old Pyrodwarf or Pyrus communis rootstock tree can probably get away with being planted with no support at all (if pruned correctly) except in very windy conditions or on light soil. However the same tree planted as a two or three year old needs support in the first couple of years. The reason is that the profile of a one year old tree is small and therefore wind resistance is minimal allowing it to grow sufficiently strong roots before it gets too large. A three year old tree however has a more developed branch structure and more foliage making it prone to wind damage in the first couple of years.

    Quince A rootstock trees need support for the first three years of their life and Quince C trees need support throughout their lives.

    The method of staking is the same whichever rootstock you have but of course a stake which is only required for a year or two can be of cheaper untreated wood whereas a stake for life should be treated to ensure it lasts as log as possible.

    The stake should be about 150cm / 5ft high and 8cm / 3in thick and you should aim to have about 60cm / 2ft underground.

    Drive the stake into ground (a largish hammer is essential for this) to a depth of about 60cm / 2ft at a 45% angle so that it crosses near, but does not touch, the pear tree stem about 60cm / 2ft high above ground level. The direction of the stake should be into the direction of the prevailing (the most common direction) wind.

    The reason for the direction of the stake is to ensure that when the wind blows it will tend to secure the stake further into the ground rather than blow it over.
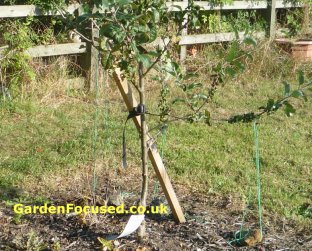

    Fruit tree staked

    Use a proper tree stake tie to attach the tree to the stake so that the tree trunk does not rub against the stake which would cause damage. Tying the stake relatively low down the tree trunk will allow some movement in the tree trunk which will encourage the roots to develop and support the tree better.

    WATERING YOUR PEAR TREE

    Young trees, from one to three years old, are the most vulnerable to water shortages. Their roots are shallow and do not spread very far which can make finding water a problem for them.

    Our advice on planting a new pear tree includes watering them well and applying a mulch immediately after planting. If the tree is planted in late autumn / winter then it should be left to its own devices as far as water is concerned until mid Spring time. There are two reasons for this, firstly for most of this time the tree will be dormant and will have minimum water requirements. Secondly the late autumn and winter weather will supply sufficient rain water for the tree’s needs.

    In the first spring through to late autumn, water your tree if the ground conditions become dry. A simple test to determine if a young tree needs water is to use a trowel to dig into the soil to a depth of 3cm / 1in and see if the soil is damp. If it is then don’t water – too much watering can damage a pear tree.

    If the soil needs watering then use lots of it once to ensure the water goes deep into the soil. Then leave the tree for at least two weeks before testing again. To effectively water a tree remove the mulch where you are going to water and then replace the mulch after watering.

    The water absorbing roots of a very newly planted pear tree will be within a a metre / yard of the trunk but as the tree grows to a two and tree year old those roots will move out slightly so water an area slightly further away from the trunk but also slightly further away from the trunk.

    For trees four years and older water requirements will depend on the rootstock used. More vigorous rootstocks such as Pyrodwarf and pyrus communis will never need watering, their root system will be wide and relatively deep. Less vigorous rootstocks such as Quince C will need to be watered when the soil becomes dry, in the height of a warm and dry UK summer this may require watering once every couple of weeks.

    FEEDING PEAR TREES

    Pear trees will survive with no feeding, especially those on more vigorous rootstocks but they will do better when fed twice a year. Feeding them will result in a better crop of fruit and also reduce their susceptibility to pest damage and diseases.

    We recommend feeding with Blood Fish and Bone in early to mid Spring and then again in late autumn with the same. A major benefit of an organic fertiliser such as blood, fish and bone is that it is very unlikely to apply too much. Pear tree roots tend to absorb water and feed much better from soil which is at the edges of the tree canopy (foliage), and this gets further from the trunk as a tree ages.

    For young trees sprinkle four or five handfuls of blood, fish and bone around the tree, but not touching the trunk, at both feed times. Increase the amount of feed as the tree becomes bigger. If it is applied to bare soil then work it lightly into the surface with a trowel and apply water. If it is applied on grass then rake it in lightly and then water.

    RE-APPLY MULCH

    Organic mulch applied around a tree will tend to be absorbed into the soil over the period of a year. Worms will do this by dragging the material down into the soil, water and general de-composition will also have the same effect. So it’s best to top up the mulch in mid Spring to its original level.

    The purpose of a mulch is twofold, to reduce water loss and to suppress weeds which, if left unchecked, will use up moisture and nutrients for their own growth. For young trees (one to three year olds) the mulch should be applied to a depth of 8cm / 3in and a spread of 1 metre / yard. As the tree ages the water absorbing roots will spread out so the area covered by the mulch should increase as well. Water absorbing roots will spread at least as far as the the canopy (foliage) of the tree.

    THINNING PEAR TREE FRUIT

    The term “thinning” is the process of removing some of the very young fruit from a tree in order to encourage the remaining fruits to develop better. Most pear trees don’t need to be thinned although you may want to do this if your tree produces lots of pears with only a few reaching maturity.

    Thin so that each blossom cluster only contains two fruits and the clusters are about 12cm / 5in apart. The best time to thin pear trees is when the the individual fruits are the size of a pea.

    WHEN AND HOW TO HARVEST PEARS

    Almost all pear trees only produce good fruit if you harvest just before they are ripe. If you leave a pear to ripen on the tree it will very, very quickly start to go mushy in the middle. The difficulty is knowing the time when they are just about to ripen. Colour and firmness are not good indicators of readiness to harvest, however there are a couple of methods of judging this and the simplest is to wait until a few pears drop to the ground and then start to harvest those that still remain on the tree.

    Another method is to use the dates give on our pear varieties page for all the common pears grown in the UK. Be sure to follow the link on that page to set your home town to make the dates as accurate as possible. Be aware that the dates given are for an average year and may differ by a week or so but at least they give you an estimate. If you don’t know the variety of the pear you’ll be forced into assuming it’s mid-season for the first year’s harvest – the variety Gorham is a good example of a mid-season pear.

    The final method of judging when a pear is ready to harvest, in conjunction with the dates found using the link in the paragraph above, is to take a pear in your hand and tilt it horizontally. If it’s ripe a very gentle pull should separate it from the branch. If it still doesn’t come off, leave it a few more days.

    Having harvested your pears some can be moved to a room inside the house at a normal temperature and they should be ready for eating after four days or so. It’s a good idea to gently press a newly harvested pear near its neck. You will feel that’s the it’s firm with no “give” in it. Doing the same test three or four days later you should be able to feel that there is now some give in the flesh and that’s an indicator that the pear is ripe to eat.

    To store pears which you don’t need immediately, place them in the fridge or a cool dark place for maximum storage life. When you need more pears bring some out of the fridge and into the house for the final ripening.

    PEST PREVENTION

    We have a unique page dedicated to identifying, treating and preventing pest and diseases of pear trees. Click here to go to that page now and feel free to ask any questions or post useful information about the subject.

    COMMENTS / QUESTIONS LEFT BY OUR READERS

    Date: 11
    August 2015
    From: Keith
    Found the site one of the best I have seen every thing I need to know . thank you.

    ANSWER: Thanks, glad you find it useful.


    We have temporarily disabled more questions because we are unable to cope with the workload of answering them at the moment. We are seeking more staff to help with this problem.

    Care


    CARING FOR YOUR APPLE TREES


    Apple trees are most vulnerable to problems in their first couple of years or so. Treat them correctly during this period and they need remarkably little attention throughout the rest of their lives. Choosing the correct variety in the first place, for your needs and situation, is crucial.

    Give established trees a good mulch once a year, thin fruit if the tree produces too much, feed them twice a year, prune them correctly and maintain basic hygiene. Those are the basic tasks to ensure you have healthy apple trees which produce lots of fruit each year.


    APPLE TREE CALENDAR

    After you have read our articles on apple trees then you may want to see our one page care calendar which can be found here. It summarises all the care jobs you may need to look after your tree. It also gives times for preventing and treating common apple pests and diseases.

    WATERING YOUR APPLE TREE

    Apple trees planted in open ground have very different needs to those planted in containers. First let’s deal with watering apple trees in open ground. Young apple trees, from one to three years old, are the most vulnerable to water shortages. Their roots are shallow and do not spread very far which can make finding water a problem for them.

    Our advice on planting a new apple tree includes watering them well and applying a mulch immediately after planting. If the tree is planted in late autumn / winter then it should be  left to its own devices as far as water is concerned until mid Spring time. There are two reasons for this, firstly for most of this time the tree will be dormant and will have minimum water requirements. Secondly the late autumn and winter weather will supply sufficient rain water for the trees needs.

    In the first spring through to late autumn, water your tree if the ground conditions become dry. A simple test to determine if a young apple tree needs water is to use a trowel to dig into the soil to a depth of 3cm / 1in and see if the soil is damp. If it is then don’t water – too much watering can damage an apple tree.

    If the soil needs watering then use lots of it once to ensure the water goes deep into the soil. Then leave the tree for at least two weeks before testing again. To effectively water an apple tree remove the mulch where you are going to water and then replace the mulch after watering.

    The water absorbing roots of a very newly planted apple tree will be within a a metre / yard of the trunk but as the tree grows to a two and tree year old those roots will move out slightly so water an area slightly further away from the trunk.

    For apple trees four years and older water requirements will depend on the rootstock used. More vigorous rootstocks such as MM106 will rarely need watering, their root system will be wide and relatively deep. Less vigorous rootstocks will need to be watered when the soil becomes dry, in the height of a UK summer this may require watering an apple tree on an M27 rootstock once a week.

    FEEDING APPLE TREES

    Apple trees will survive with no feeding, especially those on more vigorous rootstocks but they will do better when fed twice a year. Feeding them will result in a far better crop of apples and also reduce their susceptibility to pest damage and diseases.

    We recommend feeding with Blood Fish and Bone in early to mid Spring and then again in late autumn with the same. A major benefit of an organic fertiliser such as blood, fish and bone is that it is very unlikely to apply too much. Apple tree roots tend to absorb water and feed much better from soil which is at the edges of the tree canopy (foliage), and this gets further from the trunk as a tree ages.

    For young trees sprinkle four or five handfuls of blood, fish and bone around the tree, but not touching the trunk, at both feed times. Increase the amount of feed as the tree becomes bigger. If it is applied to bare soil then work it lightly into the surface with a trowel and apply water. If it is applied on grass then rake it in lightly and then water.

    RE-APPLY MULCH

    Organic mulch applied around an apple tree will tend to be absorbed into the soil  over the period of a year. Worms will do this by dragging the material down into the soil, water and general de-composition will also have the same effect. So it’s best to top up the mulch in mid Spring to it’s original level.

    The purpose of a mulch is twofold, to reduce water loss and to suppress weeds which, if left unchecked, will use up moisture and nutrients for their own growth. For young trees (one to three year olds) the mulch should be applied to a depth of 8cm / 3in and a spread of 1 metre / yard. As the tree ages the water absorbing roots will spread out so the area covered by the mulch should increase as well. Water absorbing roots will spread at least as far as the the canopy (foliage) of the tree.

    PEST PREVENTION

    This section is about how to prevent diseases in apple trees, if you are more interested in identifying and treating existing pests and diseases then click here for information. The preventative measures below are for general apple tree care and do not deal with special conditions which some apple tree growers may encounter.

    CHOOSING THE CORRECT VARIETY
    Some areas of the UK and some soil types are more likely to suffer from certain pests and diseases compared to others so it’s well worth while asking other local gardeners or at the local allotment what to look out for. An example would be canker which is more common on clay soils. If that’s the case then Winston, Katy, Lord Derby, Newton Wonder and several others have a good degree of resistance to canker. On the other hand, Cox’s Orange Pippin, James Grieve and Spartan are very liable to suffer from canker and are therefore best avoided.

    Apple Scab is another common disease which is transferred by air and rain. So if you are on an allotment with lots of other apple trees and pear trees nearby look for resistant varieties (there are many) and avoid those prone to this disease.

    FUNGAL INFECTIONS
    Several fungal infections affect apple trees and they are notoriously difficult to cure once they take hold. The key is to prevent them in the first place by ensuring fallen leaves and apples are picked up and burnt / disposed of well away form your tree. Correct pruning, especially cutting out crossing branches and keeping the centre of the tree open will greatly help avoid diseases of this type.

    BITTER PIT
    If your gardening routines often result in neglect of your apple tree(s) then bitter pit may be a problem. It is caused by irregular watering and lack of some nutrients. The way to avoid it is to water and feed regularly but at the same time some varieties are very susceptible to this disease. They include Bramley’s Seedling, Cox’s Orange Pippin, Egremont Russet, Newton Wonder and Warner’s King amongst others. However, Jonagold and Gala both have good resistance.

    GREASE BANDS
    In some areas wingless moths climb up the trunk of apple trees, normally from November occasionally right through to April and then lay eggs on the leaves. These can be prevented by grease bands placed around the trunk of an apple tree in October.

    THINNING FRUIT

    This is often a hard task to carry out, not because it takes much time or is difficult, but mainly because many gardeners cannot bear the thought of cutting off developing fruit. The truth is though that if your apple tree, particularly cooking varieties, has a large crop of developing fruit your best option is to thin the fruits out.

    Experience plays a great part in knowing how much to thin out apples because different varieties produce fruit in slightly different manners. Our preferred method is to do nothing until after an apple tree has gone through “June drop” which is when many apple trees naturally shed some fruit. If the tree still looks like it will produce a lot of fruit we thin each cluster of fruit by first removing the central (“king”) apple then thinning the cluster to two healthy looking apples, one on either side of the cluster. Many apple trees will not require any manual thinning of fruit at all.

    HARVESTING APPLES

    Harvesting and storing apples can be as easy or as complicated as you want. However, get it right and with three trees you can be eating and cooking apples from late August to mid March. Click here for our page dedicated to harvesting and storing apples.

    PRUNING APPLE TREES

    Stick to the basics and pruning an apple tree need not take lots of knowledge and time. Read our detailed instructions and help guide on how to prune apple trees by clicking here.