KEY STEPS IN PLANTING YOUR APPLE TREE
Give thought to the following points before you plant your new apple tree, all are discussed in more detail further down the page:
- Equipment required for planting – get it all ready before you start planting your tree.
- When your tree arrives – get it planted as soon as possible (both bare-rooted and pot grown) but don’t plant in freezing or very wet weather.
- Soil conditions – apple trees are reasonably tolerant of soil conditions but they prefer a free-draining soil but not sandy conditions.
- Position – In full sun to partial shade out of the way of strong winds. Avoid frost pockets and if you can’t then pick your variety of tree carefully.
- Spacing – one of the easiest mistakes to make and one of the easiest to avoid is to get the spacing correct from nearby plants and apple trees.
- Protect from animal damage – rabbits, hares and deer can all kill your new tree stone dead in a matter of a couple of days so provide protection for vulnerable new bark when you plant a tree, see equipment required below.
EQUIPMENT REQUIRED
Before your tree arrives have the following equipment ready for planting:
- A spade to dig out the planting hole.
- A support post and a plastic / rubber spacer tie specially designed to attach newly planted trees to your support post. The support post should be reasonably strong (about 8cm / 3in) wide and about 150cm / 5ft high.
- A heavy hammer or something similar to bang the post into the ground.
- For bare-rooted trees, a bucket full of water.
- Preferably a mulch to place around the tree when it is planted. This can be well rotted compost, bark chip or wood chip. A black plastic mulch can also be used, although make lots of holes in it to allow rain water to easily pass through the surface into the soil below.
- Two people make the job easier and quicker although it’s perfectly possible for one person to plant a young tree successfully.
WHEN YOUR TREE ARRIVES
If you have more than one tree to plant then ensure that each tree is labelled to show which variety it is. Nothing is more annoying than having three or so apple trees arrive then unpacking them only to find out that you can’t tell which is which! Remember, one young apple tree looks much the same as any other apple tree.
Bare-rooted apple trees need to be planted as soon as possible after they arrive or when you bring them home. With container grown apple trees time is not quite so crucial but it’s definitely best to plant them as soon as possible. Plant on a frost-free day and when the soil is not frozen from previous cold weather. Don’t plant when the soil is very wet.
The British weather however is not always reliable and you may need to store your new tree for a week or so until the weather conditions are suitable. If you need to delay planting a bare-rooted tree then you will need to heel it in immediately it arrives until the weather is correct for planting. The principle behind “heeling in” is simple – get the tree into temporary soil which is moist and not frozen solid and store it there until the time is right.
Although the apple tree retailers almost insist on planting their trees immediately they arrive, and this is most definitely the best idea, heeling in is a well-established practice which will keep a bare-rooted tree in very good condition for at least a week and often more. The best way to heel in a a young tree is to dig a hole in some well dug soil adding lots of compost to break up the soil and warm it if frozen. Then place the roots of the tree into the hole and cover with the dug soil / compost. The roots should be covered completely with the soil.
It’s not even absolutely essential to keep the tree upright, it can be on its side, slightly pointed upwards with a support to keep it off the ground, just make sure that the roots are well covered with firmed down moist soil. Water the soil well and make sure the tree is well-supported. Later when you are ready to plant it permanently remove the top soil with your hands and gently tease it out from the remaining soil.
If you need to store a container grown tree then make sure the soil in the pot is moist and store it out of direct sunlight and away from strong winds. Against the outside walls of a heated house or in an unheated greenhouse is probably the best place.
NEVER STORE A BARE-ROOTED OR CONTAINER GROWN TREE INDOORS! The conditions inside a house will dry the tree out faster than you can say “I love apples”!
IDEAL SOIL CONDITIONS FOR APPLE TREES
Apple trees are generally tolerant of most soil conditions so it’s probably easier to describe what conditions to avoid. Most varieties do not grow well on light sandy soil (James Grieve and Fiesta are better than most though). Apple trees also do not grow well on water-logged soil.
Almost all other conditions are fine for apple trees including clay soil. If your soil is sandy or very heavy clay then mix in well some well-rotted compost or used multi-purpose to the soil you dig out to make the hole.
POSITION
A very common problem when planting apple trees is to position them too near other trees or plants. This sometimes only becomes obvious three or four years later when your tree is well established and very difficult to move. The size of an apple tree depends on four factors:
- The rootstock is in most cases the key factor to the final size (height and spread) of your apple tree.
- The variety of apple tree. In most cases, varieties grow to approximately the same size but there are a some which are well known to grow larger compared to others on the same rootstock. For example triploid varieties tend to grow larger than other varieties, two of the best known are Blenheim Orange and Bramley’s Seedling. Read up about any varieties you plan to plant and note if they tend to grow larger than normal and adjust the spacing around it accordingly.
- Growing conditions can affect the eventual size of your tree. In poor conditions, sandy and / or poor levels of nutrition, they well turn out to be a slightly smaller tree compared to one grown in substantial soil with high levels of nutrients.
- Pruning obviously affects the size of a tree. Regular pruning designed to reduce the eventual size of an apple tree can keep its size to about three-quarters of a normally pruned tree. Remember though that pruning of this type needs to repeated for ever. If you forget to prune well for a year or two the tree will simply grow back to its normal size.
Established apple trees are more than able to cope with planting of bedding plants and other shallow rooted plants near their base. However don’t plant other apple trees, shrubs or deep rooted plants in the same area. As a rule of thumb leave an apple tree about one and a half times its maximum spread clear of other deep rooted plants.
The supplier of your apple tree should be able to give you a good idea of its maximum spread.
If this information is not forthcoming then some guesswork is required and you will only ever be able roughly estimate the space required. If you know the rootstock then a good estimate for spacing between other apple trees / large shrubs would be:
- M27 rootstock – allow at least 3m / 9ft between trees
- M9 rootstock – allow at least 3.6m / 11ft between trees
- M26 rootstock – allow at least 4.5m / 14ft between trees
- MM106 rootstock – allow at least 6m / 18ft between trees.
Note that the above are the distances between one tree trunk and the other, not the distance required between the final overall spread of the trees.
PROTECT FROM ANIMAL DAMAGE
Young tree bark, especially apple tree bark, is very attractive to rabbits, hares and deer to name but a few animals. If you live in an urban area, deer are unlikely to be a problem but in more exposed situations they can kill a young apple tree overnight.
Rabbits and hares are the easiest threat to deal with. Buy spiral tree guards and place them round the base of the tree trunk to protect from rabbits and hares. Remove the guards after a couple of years when the bark will have become hardened and unattractive to rabbits and hares.
To protect from deer damage you need to erect fencing / wire-mesh around the tree to prevent them getting anywhere near it. Do this immediately after planting if you have any suspicion that deer may be a problem.
PLANTING YOUR APPLE TREE
Before you start to dig the planting hole make sure your tree is fully hydrated. If it’s a bare rooted tree then place the roots in a bucket of water while you dig the hole. If it’s a container grown tree then water the container well before digging the hole.
Dig a hole which is slightly wider than the container or two to three times as wide as the bare-roots ball and deep enough to take either so that the tree is to the same depth in the container or as it was, if bare-rooted, at the nursery. Bare-rooted trees will have a soil mark near the base of the trunk showing how deep they were planted.
For container grown trees remove the tree from the container disturbing the roots as little as possible. Place the tree in the dug hole and and check that the surrounding soil will be at the same level as the soil in the container – add or remove soil as required to achieve the correct height. Fill in the hole with soil firming it down as you go. Don’t apply too much pressure on the soil, just enough to ensure that any air gaps are filled with soil.
The same idea applies to bare-rooted trees but spread out the roots into the hole before adding soil. Place the tree to the correct depth in the hole (two people make this a lot easier) and gradually sprinkle on soil gently firming it down as more soil is added.
Finally water the soil around the tree very well. We recommend applying a mulch around the base of your apple tree but leave a gap of 3cm / 1 in or so of clear soil around the base of the trunk so that the mulch is not touching it. A mulch depth of 8cm / 3in and a spread of 1 metre / yard should be fine. It’s best to mulch a new apple tree after watering it and after the support stake has been put in place (see below, Supporting a New Apple Tree).
SUPPORTING A NEW APPLE TREE
Newly planted apple trees require support for the first couple of years until their roots are strong enough to support them. Some require support throughout their life, it all depends on the rootstock used.
The more vigorous rootstocks require only two years support and by far the most common of these is MM106 in the UK.
It’s interesting to note that a one year old MM106 rootstock tree can probably get away with being planted with no support at all (if pruned correctly) except in very windy conditions or on light soil. However the same tree planted as a two or three year old needs support in the first couple of years. The reason is that the profile of a one year old tree is small and therefore wind resistance is minimal allowing it to grow sufficiently strong roots before it gets too large. A three year old tree however has a more developed branch structure and more foliage making it prone to wind damage in the first couple of years.
The slightly less vigorous rootstock, M26, needs to be staked for up to five years and maybe for life if conditions are particularly windy or the soil is sandy.
Next down the scale as far as vigour is concerned is the M9 which requires staking throughout its life. Finally the least vigorous rootstock commonly found in the UK is M27 which will require staking throughout its life.
The method of staking is the same whichever rootstock you have but of course a stake which is only required for a year or two can be of cheaper untreated wood whereas a stake for life should be treated to ensure it lasts as log as possible.
The stake should be about 150cm / 5ft high and 8cm / 3in thick and you should aim to have about 60cm / 2ft underground. We’ve shown a very basic diagram of how the stake should be placed against the tree but will add a real picture at the end of November when we plant our next apple tree.
Drive the stake into ground (a largish hammer is essential for this) to a depth of about 60cm / 2ft at a 45% angle so that it crosses near, but does not touch, the apple tree stem about 60cm / 2ft high above ground level. The direction of the stake should be into the direction of the prevailing (the most common direction) wind.
The reason for the direction of the stake is to ensure that when the wind blows it will tend to secure the stake further into the ground rather than blow it over.
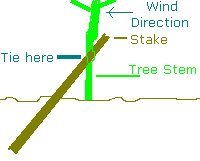
Use a proper tree stake tie to attach the tree to the stake so that the tree trunk does not rub against the stake which would cause damage. Tying the stake relatively low down the tree trunk will allow some movement in the tree trunk which will encourage the roots to develop and support the tree better.
Rootstocks and Size
Guide to Planting
Care Plan
Pruning Apple Trees
Harvest and Storage
Pests and Disease
Pollination Groups
YOUR GUIDE TO PLANTING APPLE TREES
By David Marks
The mechanism of planting an apple tree is relatively simple, it’s basically dig a large enough hole, drop the tree in to the correct depth and fill in with soil. Although a simplification, that’s very nearly it.
Even more important though is where to plant your apple tree, this will have far more bearing in the long term on its success or failure. Another important factor is how much support your apple tree needs in its first years and sometimes for its life.