CLUB ROOT IN BRUSSELS SPROUTS
This is a very serious disease of all brassicas including Brussels Sprouts, it is also almost certainly totally avoidable unless you have inherited a garden or allotment where it is already in the soil.
It is serious because once in the soil it will stay there, not just for years, but for decades. It is avoidable because good soil management (we explain this in detail lower down) will prevent it ever occurring.
PREVENTING CLUB ROOT ON BRUSSELS SPROUTS
The first measure to take is to practice good crop rotation and never plant Brussels sprouts, any form of cabbage, broccoli, calabrese, auliflower, kale, kohlrabi, swede, turnip, chard, spinach or rocket (i.e. all the vegetables in the brassica family) in soil where they have been grown in the previous three (better still four) years.
Doing this will prevent the build up of this pest and allow the soil to recover after growing these crops. Our article on crop rotation will help you greatly and our vegetable calendar will automatically generate a crop rotation plan for you if needed.
The next key preventative measure as far as club root is concerned is to test the soil pH before sowing / planting brassicas. Club root is encouraged in over-acid soil, testing the soil and applying lime when needed will maintain your soil at the correct soil acidity. Easy to do and it requires very minimal expense, click here for more detail on soil pH.
Badly drained heavy soil is also often a cause of club root. Brussels sprouts prefer a heavy soil, it allows the roots to support to top heavy growth but they do not like a water-logged soil.
it is quite possible to introduce club root to an otherwise clean site by using transplants from an infected area. Think carefully before accepting any brassicas from a friend or neighbour. They may not realise the plant is infected. Occasionally the disease can be transferred by mud on boots or digging implements.
HOW TO IDENTIFY CLUB ROOT ON BRUSSELS SPROUTS
The first sign of club root will be slightly deformed and stunted foliage, often it has a bluish tinge to it. In warm weather the plants will quickly wilt. All this is caused by infected roots which are not able to support the above-ground growth.
If you dig these plants up the roots will clearly be enlarged, distorted, possibly rotting and black. You will also notice that the more delicate hair like roots common on Brussels Sprouts are almost entirely missing.
TREATING CLUB ROOT ON BRUSSELS SPROUTS
In years gone by there were chemical treatments available to the amateur gardener for club root but over the past twenty years or so they have all been banned because of their dangerous side-effects, no chemical treatments are now available.
All hope is not lost though! First, dig up all trace of any plants in the affected area and burn them. Clean your boots and digging implements away from the garden / allotment.
The next time you want to grow Brussels Sprouts on that patch of land (four years time if practicing good crop rotation) use a club root resistant variety. This won’t guarantee success but some varieties may well work well on infected land. See our article on recommended varieties for details of club root resistant varieties.
CABBAGE ROOT FLY
Cabbage Root Fly attacks should be treated as a fact of gardening if you grow any vegetables in the cabbage family including Brussels sprouts. The good news is that this pest definitely prefers cauliflower and calabrese but Brussels sprouts are definitely on its menu some years.
PREVENTING CABBAGE ROOT FLY ON BRUSSELS SPROUTS
The key preventative measure solely to prevent cabbage root fly is to place small discs of material around the stem of the plant. Pre-made discs can be bought from garden centres and diy store or you can make them yourself.
Cut carpet underlay into squares of about 15cm / 6in, cut out a small hole in the middle and then cut the square from one edge to the centre hole. Place the square around the centre of the plant and this should prevent the female fly from laying eggs in the soil near the roots. This may not prevent all eggs from being laid but it will prevent the vast majority.
The first generation of eggs will be laid from mid April to mid May depending on weather conditions and it is this generation which causes the most damage. The squares mentioned above need to be in place before the first generation of eggs are laid which means they will need to in place before you transplant your Brussels sprouts to their final growing position.
Many gardeners place an insect proof mesh over their Brussels sprouts (and other members of the cabbage family) and this will prevent attacks by some of the cabbage root fly but the main reason mesh is used is to prevent attacks by the cabbage whitefly (see further down this article).
The Cabbage Root Fly, which lays eggs in the soil surface near the plants, finds your Brussels sprouts entirely by scent. Damaged plants and thinnings give off the most scent so thin Brussels sprouts at midday because the flies come out principally in the early evening.
Several well researched studies have confirmed that the flies initially find crops by smell but this is not all the story.
Click here to read one major paper on this research. It is rather complicated so we have summarised below the findings and limited them to the Cabbage Root Fly.
Note that the research applies not only to Brussels Sprouts but all plants which are attacked by the fly (e.g. cabbages, calabrese, cauliflower etc.).
- The cabbage root fly finds the approximate location of a Brussels sprout plant based on scent alone. It will NOT be deterred or confused by the scent of other plants including onions, garlic, marigolds etc.
- The fly then looks for green leaves (or anything which is green) and lands on one, this selection is completely random – the nearest leaf or green object will do.
- Using its feet and other mechanisms it tests the object for suitability – is it in fact a Brussels Sprout leaf? Whatever the result (the first time it lands) it then flies to another very nearby green object and tests again.
- The fly needs to find and test a specific number (about four) of leaves and confirm that they are all Brussels sprouts plants before laying eggs. If the fly lands on a green object which is not a Brussels sprout it has to start the process again.In other words it must land on four separate leaves in succession and find all are correct before laying eggs. Any one landing on a non-Brussels Sprout leaf and it has to start again. Too many “false” landings and it flies off elsewhere.
Key to the above is that the fly will choose any green object to land on, leaf, stem, man made – anything as long as it’s green. The study concludes that inter-planting (not nearby planting) Brussels sprouts and other green crops greatly reduces the chances of a cabbage root fly laying eggs. They suggest inter-planting with clover because it can easily be dug into the soil and actually improves the soil condition.
The research also tested man made green cut-out false leaves on a cardboard stem and found that they worked exactly as well as green leaves.
We leave you to test this out on your own plot. For us in 2019 we will do
a two part test plus a control group. Test 1 will be to under-plant with clover. Test 2 will be to mulch with lawn clippings, adding more as the existing ones turn brown. Test 3 will be to grow the crop on bare soil which is kept well weeded. We await the results with considerable expectation of success.
HOW TO IDENTIFY CABBAGE ROOT FLY ON BRUSSELS SPROUTS
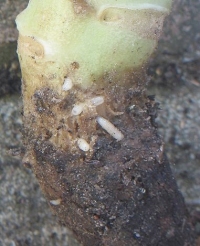
Affected plants will be smaller than normal with grey leaves which easily wilt in warm weather. When the roots are dug up they will have small white maggots either in the roots or in the nearby soil. The roots themselves are very poorly developed. Occasionally the attack can spread to the sprouts themselves although this is unusual.
HOW TO GET RID OF CABBAGE ROOT FLY ON BRUSSELS SPROUTS
The first point to note is that there is no chemical spray available to the gardener which will get rid of cabbage root fly. With this in mind we suggest that the preventative measures above are your only real option.
CABBAGE WHITE BUTTERFLY / MOTH / CATERPILLAR
This is the one that will drive you crazy! Any brassica leaves including those on Brussels sprouts are a potential meal for this pest. Often called the Cabbage White Butterfly it is the caterpillar stage of this pest which does all the damage.
The problem is that they munch on the tender inner leaves making it difficult to even see them let alone get rid of them. They can decimate your crop within a matter of weeks if left to their own devices.
PREVENTING CABBAGE WHITE BUTTERFLY ON BRUSSELS SPROUTS
There are hundreds of proposed methods of preventing attacks by the cabbage white butterfly but in the end there is only one solution, you need to protect your crop with netting. It’s the only solution which works.
In our opinion Enviromesh is the best of all the netting options (we have no connection with the manufacturers of Enviromesh whatsoever). It stops insects getting in and at the same time lets light and water in.
When you first put the Enviromesh in place, as soon as the seedlings emerge, make sure that all the edges are tucked well under the soil, the Cabbage White will find even the slightest gap in your defences.
Keep the mesh in place for as long as you can, the sprouts will grow tall so you may well not be able to
provide protection through the later stage of their life but these later attacks are always less severe than the primary attack.
For a detailed comparison of various insect mesh productsclick here for our in depth article.
BRUSSELS SPROUTS ARE OPEN AND BLOWN
The reasons behind blowing of your brussels sprouts is one of the hardest gardening questions to answer so let’s try and shed some light on the problem.
When Brussels Sprouts produce open florets, rather than tight green buds, they are effectively trying to prematurely produce seeds. Normally this would occur in the year after thay have been planted but something has caused them do this earlier.
In almost all cases when this happens, not only to Brussels Sprouts, the plant is under stress and believes it is close to dying. Natural in-built reactions force it to produce seed early, albeit smaller amounts, in order to ensure survival of the next generation.
If you accept that explanation, then the next question is how to avoid or reduce that stress. Sprouts are notoriously difficult veg to grow, having several specific cultural requiements. One primary requirement they have is a system of well developed roots to anchor them to the ground. If they are blown in the wind the underground roots can break causing them stress. Well drained clay soils are their best friend.
In order to encourage a strong root system, transplanting them at the correct time is the best solution. It encourages new and stronger roots. See here for more details.
Aside from the notes above, ensure they are watered and fed as described here to reduce stress.
NEXT PAGE – RECOMMENDED VARIETIES OF BRUSSELS SPROUTS
When and How to Sow Brussels SproutsOngoing Care of Brussels Sprouts
Pests and Diseases
Recommended Brussels Sprouts Varieties
Brussels Sprouts Recipes
PEST AND DISEASE OF BRUSSELS SPROUTS
It would be nice to open up this section by saying how resilient Brussels Sprouts are to pest and diseases but unfortunately they do suffer from a few significant problems. This page not only identifies what those problems are but goes into detail about how to prevent them. We have presented the pests and diseases below in the order that you can best apply preventative measures. Measures to prevent club root are presented first because preventative measures can be taken first. Next comes Cabbage Root Fly because collars can be put round the stems at planting time …. and so on throughout the year.