BAY TREES IN CONTAINERS OR OPEN GROUND?
This article is primarily about growing bay trees in containers however they can also be grown in the open ground when given the correct conditions. The particular requirements for growing open ground bay trees are:
- a temperature which does not drop below -5°C (32°F). Below this temperature the tree may be damaged especially if subjected to windy conditions at the same time. We have seen bay trees grown successfully in temperatures lower than this but they are in well-protected positions and generally next to the walls of heated buildings. For more detailed information about how frost affects bay trees and how to prevent it, click here.
- the soil must be free-draining, heavy clay soil is not suitable. If your soil is clay then digging out a large area and mixing the soil with lots of compost and sharp sand can make the conditions OK.
- their position should be protected from strong winds which would damage the leaves. They prefer a full sun or lightly shaded position in the UK.
If you can provide these conditions then you also need to remember that bay trees which are not regularly pruned can reach a height and width of 12m (38ft) so allow enough space when planting.
GROWING BAY TREES IN CONTAINERS
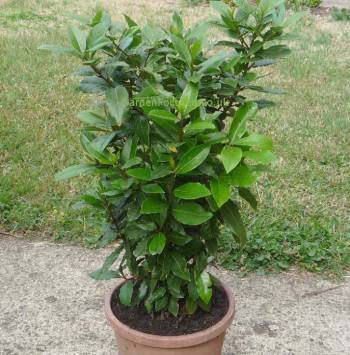
Bay trees grown in containers generally take three forms. The bush tree as seen in the picture below, (click to enlarge the picture), standard or lollipop formed, and those which have been subjected to topiary and grown into a specific shape.
Container grown trees thrive on being regularly pruned either into specific shapes or simply pruned to keep them to a required height and spread. Not only are they excellent evergreen plants but at the same time their leaves can be used for a huge number of cooking recipes.
BEST POSITION FOR BAY TREES IN CONTAINERS
The best place to position your bay tree is based on years of experience. Getting the correct position will go a long way to avoiding those dreaded brown leaves and other environmental problems. In summary:
- The first rule is to grow your bay tree out of harsh winds. That includes both cold winter winds and scorching summer breezes. We would go so far as to say that this rule is the most important of all.
- In a position where it won’t get too much water. This is especially important in spring, autumn and winter where natural UK rainfall levels will be higher than in summer. Bay trees do not like water-logged roots at all. Place the pot / container on stands if possible to allow excess water to drain away as quickly as possible.
- In winter, position the container either in an unheated greenhouse or outside against a heated house wall. This will prevent wind burn and provide some minimal protection against harsh cold weather. Never bring your bay tree into a heated house, it will damage it, significantly in most cases.
- In full sun or semi-shade? Before you decide on that make sure the 3 conditions above have been satisfied. If they have, your bay tree will grow very happily in semi-shade although they have a slight preference for full sun in normal UK weather conditions.
BUYING BAY TREES IN CONTAINERS
Buying bay trees can be something of a minefield. Pictures on the internet are often misleading as far as true size is concerned and of course, the bay tree you receive may well not be anywhere as good as the picture portrays!
It’s not unusual to pay £50 for a standard lollipop bay tree in good condition so make sure you buy from a reputable company. You may pay a couple of pounds more but you are far more likely to receive a tree which is worth the money.
Packing is also important, a badly packaged or transported bay tree can easily be damaged. Customer service is also vital if there is a problem. Choose a company which has been in business for several years at least, that in itself a guarantee. Companies which have traded for many years are still trading for a reason.
Out of all of them, our personal recommendation would go to Crocus at the current time.Click here if you want to order a bay tree from them online.
BAY TREE CARE
When you buy a potted bush bay tree it may have been grown so that a number of shoots, growing from the main roots, form the young tree you see above ground. This provides you with an ideal opportunity to split off one or two of the shoots and replant them as separate bay trees. These individual shoots are perfect material for forming another bush or experimenting and start growing a standard bay tree – all for the cost of a single plant.
To do this gently burrow into the compost around the base of a shoot and trace it down as far as you can. At that point break it from the main root with as much of the stem roots in tact as possible. Now just pot it up in multi-purpose compost to the same depth and water well. The bay stem will grow away with almost no check whatsoever.
Your new bay tree will, in all likelihood, benefit from being potted up soon after you buy it. Multi-purpose potting compost will do just fine especially if the pot has a bit of weight to it. If the pot is a light plastic then you can give it some weight by potting the new plant into John Innes Number 2 compost. Drainage is important so add some stones to the base of the pot before adding compost.
When potting up a bay tree only transfer it to a pot which slightly bigger than the previous one – 5cm / 2in wider at most. If a potted bay tree is given too much room it can often suffer for a long period of time.
For more drainage it’s a good idea to put pot feet under the base of the pot to keep it off the ground and let excess water flow away in rainy conditions. As far as feeding is concerned, a small handful of long-lasting fertiliser such as blood, fish and bone once a month (April to September) will do just fine. Sprinkle it over the surface of the soil and gently work it in to stop it blowing away.
Water sparingly only when the soil surface is definitely dry. Every three years or so re-pot your bay tree into a slightly large container. Take this chance to gently tease some of the old compost from the roots and the surface, replacing it with new compost.
WHEN AND HOW TO PRUNE BAY TREES IN CONTAINERS AND POTS
Bay trees are very tolerant of minor pruning although when they are hard-pruned they may take a year or so to recover. The best time to prune you bay tree is in late spring through to mid summer. Cut away any dead or damaged leaves to a healthy bud which is facing in the direction you want the stem to grow. Cut to shape in exactly the same way.We would suggest that a maximum height of 135cm / 4ft 6in is about the tallest most people can effectively manage for an untrained bush shaped bay tree.
Bay trees often throw up “suckers” or new shoots from just below or just above the soil level. That’s fine if you are growing them in a bush shape, they will simply expand the plant at the base which is beneficial. However, if you are growing standard bay trees with a bare stem these suckers don’t look good. They should be pruned off with a sharp pair of secateurs if growing above soil level. If growing below soil level just remove some of the soil around the base of the sucker and prune it off as low down as possible. The sucker may appear again in a few months so just do the same again. It doesn’t take many attempts (most times one will do) before the shoot stays pruned! The pruned suckers can be used to propagate new bay trees but that is outside the scope of this article.
WHEN AND HOW TO PRUNE LARGE BAY TREES
Large bay trees withstand even very hard pruning very well including cutting back the main trunk, it’s difficult to permanently damage an established one. However they are well known for taking two or three years to get back into shape.
Like many trees they are best pruned in late spring during a dry period. The plan of action, if you want to halve the size of a large bay tree without disfiguring it completely, would be to prune away about a quarter of the tree in year one then slightly less in year two and finally tidy it up to the required size in year three. Regular pruning after that annually in early spring will keep it to the size you want. It really is that simple!
Your next question may well be what can the bay tree wood and leaves be used for? Obviously some of the leaves should be dried out and given to friends and family for use as a herb. If you have kids then they will find it fun to make a bay laurel wreath either to crown their heads or hang off the door. Young, new bay tree wood can be carved and if you have any really large branches then trim them up to make a walking stick. Let the wood season and dry out before using it and you will have a walking stick for life.
PRUNING BAY TREES TO A LOLLIPOP / STANDARD SHAPE
There is very little information on the internet showing how to prune bay trees to a lollipop shape because the process takes three to four years. However we have done exactly that and the picture below shows the results of our efforts – click the picture to enlarge it.
Two things particularly surprised us when growing this bay tree, the first being how easy it was to achieve even though it took four years. The second surprise was how little support the tree required. That slim cane you see supporting the trunk has stood the test of time.
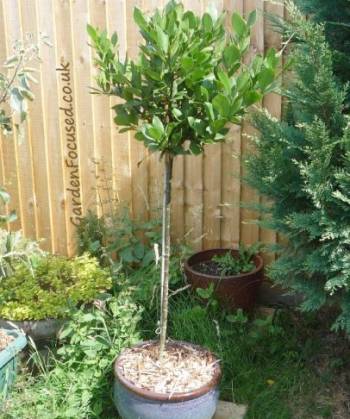
If you enlarge the picture you’ll see more clearly that maybe the top lollipop part of the bay tree isn’t as tight as shop bought ones but remember a bay lollipop tree of this height would probably cost you in excess of £60 in a garden centre. If we wanted to improve the shape we would prune the stems again to only two shoots to keep a tighter round shape at the top.
To prune a young single-stemmed bay tree to become a lollipop or standard bay tree first start by removing all the shoots from the main stem (but not the leaves) except the top main growing shoot. As the bay tree grows in height remove any shoots which appear, normally from between a leaf and the main stem.
After two to three years the stem should have grown to about 90cm / 3 foot . When the tree has reached just below the required height leave four to six of the topmost shoots which emerge from the main stem to grow. These shoots will then form the bushy top part of the lollipop tree. Prune out the tip of them main stem to stop the tree growing higher.
As the top shoots grow, prune the tips after each shoot has formed two to three side shoots. Make sure you prune down to a bud which is facing inwards to encourage a dense top of the lollipop.
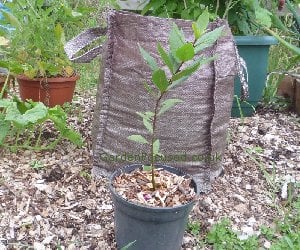
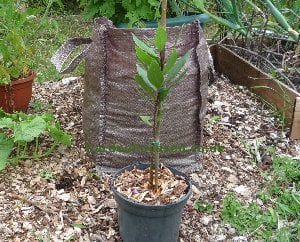
Standard bay trees are liable to snapping in high winds and will need the support of a cane tied into the main stem. In the initial stages of growth, without a support, your tree will probably very soon start to list to one side and it is at this stage that a cane will be required. This is not so much to support it (when young the stems are very flexible)
but more to ensure the main trunk grows upright and straight. As the tree grows more, the support will become too short and you will need to replace it with a taller cane, you may need to do this three or four times.
Tie the main trunk to the support cane at several points as it grows.
The first picture below shows a young bay tree growing slightly lop-sided. The second picture below shows the same tree tied into a bamboo cane to encourage it to grow straight upwards. Click either of the pictures to enlarge them and see more clearly.
KEEPING THE LOLLIPOP SHAPE
If you don’t prune a lollipop shaped bay tree it will tend to lose some of its shape over a few years.Two things will happen, firstly some stems will grow longer than others causing the ball shape to become uneven. Secondly the ball shape will become less tight and the stems will spread out rather loosely. There’snothing wrong with this, however some people do prefer to maintain the tight shape as it was when they bought the plant.
To help do this prune the stems two or three times a year using a pair of secateurs. Prune them to the length you want to maintain the shape. You will find that there are not many stems to prune if you do it regularly but it will encourage other stems to form which will make the shape more dense.
When you prune a stem always do it to an inward facing bud even if that means pruning it slightly too short. When the bud just below the cut starts to grow it will then grow inwards rather than outwards which also helps maintain the tight lollipop shape.
RECOMMENDED VARIETIES OF BAY TREES
There are very few varieties of bay tree aside from the normal one found at garden centres, Laurus nobilis. The other alternative is to go for the cultivar Laurus nobilis Aurea which has yellower leaves.
PESTS AND DISEASES OF BAY TREES
BAY TREE SUCKER
The first signs you will notice are the edges of some leaves curling inwards and start to thicken. The edges turn yellow then brown.
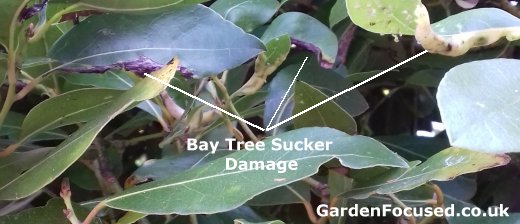
![]()
For more signs of Bay Tree Sucker and how to treat them,click here.
BLACK POWDER COATING ON LEAVES
This often looks like a fine layer of soot and can affect all the leaves or just a few. It is caused by sap-sucking insects such as aphids which excrete a sugary liquid. This liquid attracts moulds and that is what causes the leaves to appear to be coated in black.
Firstly, wash away the black coating with water. If that doesn’t remove it, add a couple of drops of washing up liquid to the water and wash off with that. You will need to wash each leaf individually with a cloth. This will not only make the leaves look and photosynthesise better but it will avoid the unwanted attraction of other insects such as wasps, bees who feed off the sugary liquid.
Then you need to treat the insects which are causing the problem. Simply washing the leaves individually will remove aphids, pay particular attention to the undersides of the leaves. If that doesn’t work then a trip to the garden centre for a general purpose insecticide may be required.
BROWN OR YELLOW LEAVES
The most commonly heard complaint is why bay tree leaves are yellow or brown and dyeing off. The first step in remedying this problem is to rule out the bay tree sucker as the cause of the damage. If it’s bay tree sucker then the new and younger leaves will be curling inwards, older leaves will be mainly unaffected. When you uncurl a damaged leaf you will likely see a tiny woolly insect possibly with some white fluffy cobweb stuff around or near it. If this is the case, see the previous paragraph.
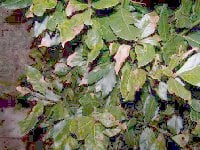
If not, the cause of the brown leaves is almost certainly environmental – too much or too little water possibly, damage from cold and wind or occasionally too much heat. The key to coping with this damage is to get the conditions correct for your bay tree. Follow the steps below and then wait and see what happens over the next six months, chances are that your tree will recover:
- Over-watering, this can be caused by hand watering, badly positioned containers or just too much rain.
ACTION
If the container is in a tray then remove it from the tray and put it on pot legs or at least a brick or two to ensure it never stands in water and allows maximum drainage. Only water the plant when the top part of the soil is dry. To check, burrow a finger gently in the soil to a depth of about 3cm / 1in, if the soil feels at all damp at the base of your finger then don’t water any more until it feels dry. - Under-watering, in winter, spring and autumn (in the UK) this is rarely a problem as long as container grown bay trees are open to the elements. Natural rainfall is usually sufficient.
ACTION
In warm weather, summer in particular, a container grown bay tree needs regular watering to keep the soil moist but not water-logged. - Cold and wind, either of these can cause significant browning and yellowing of leaves, if both conditions are present then you will certainly have problems. The problem may not be apparent for a couple of months so you need to protect your bay tree from these conditions throughout the year.
ACTION
Bay trees may well be damaged when the temperature drops below -5°C (32°F), so in winter position them near the walls of a heated house out of the way of strong winds. Often the best place in winter is in a corner between a fence on one side and the walls of the house on the other. They should be moved to a more open position in summer. Clear the area around the container of all vegetation and preferably place it on a layer of gravel. For more detailed information about how frost affects bay trees and how to prevent it, click here. - General care, dead leaves, compacted soil and lack of feeding can all contribute to the general health of your bay tree. If you decide that browning leaves are a problem then take the following action as well.
ACTION
Remove the top 3cm / 1in of compost and replace it with clean, new compost.
In spring and summer, if you haven’t fed your bay tree for a few months, scatter some long-lasting fertiliser (blood, fish and bone but not a nitrogen rich fertiliser) onto the soil surface and gently work it into the surface. Only do this if you have forgotten to feed your plant previously and only a very small handful – a level tablespoon should be enough at first.
Remove all leaves which are completely brown or yellow and dispose of them well away from the plant (preferably burn them).
Over the next few months inspect your plant weekly (we are guilty of an almost daily look at our bay trees) and remove any damaged leaves. Be careful not to remove all the leaves at once because even partly damaged leaves contribute to the growth of a plant, but remove a few at a time. Damaged leaves attract bugs and disease and slowly removing them will improve the overall health of your bay tree.
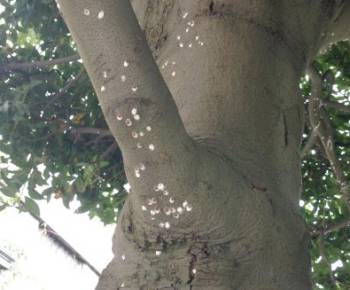
WHITE MARKS ON BARK AND STEMS
See the picture below. This is the Wooly Scale insect and we have a
section
here devoted to this problem.
BARK IS PEELING OFF / CRACKING
This is an environmental problem rather than a pest or disease. With bay trees in containers the problem is caused mainly by overwatering and / or allowing the soil to dry out and then overwatering. Too much water is causing the trunk to swell and split the bark.
The solution is to restrict the amount of watering and also try and maintain an even level of moisture in the soil. Bay trees in containers are very tolerant of lack of water for a month or so. If this has occurred don’t soak the soil with water, water it back to a moist condition over a month or so.
Bad drainage can also be a problem causing water to accumulate in the container. Raise the container slightly off the ground on gravel or pot legs.
Splitting / peeling and cracking bark can also be caused by prolonged periods of very cold weather. The frost gets into small existing cracks and opens them up.
There is nothing which can be done once the bark is split but if the upper part of the tree has healthy leaves on it the tree will, in all probability, be fine if drainage is increased. In cold weather move containerised trees to a protected position against the side of a house or into an unheated greenhouse.
BAY TREE LEAVES HAVE HOLES IN THEM
There are two main causes of holes in the leaves and they can easily be differentiated. There is also a third, less common cause, which is the leaf cutter bee. If the damage is to the edges of the leaves it is most likely caused by vine weevils. The damage looks like a bug has munched on the edges of the leaves leaving semi-circular, ragged damage. The picture below illustrates the damage.
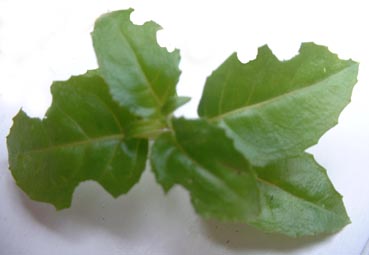
Typical Vine Weevil leaf damage
Vine weevils can cause significant damage to all bay trees (the leaf damage is just the start) especially those in containers. Take action immediately as described in our page on how toidentify and treat this pest.
The other common cause of holes in bay tree leaves is called Shot hole which is a fungal infection. the picture below shows the typical hole damage to the leaves which are not normally around the edge.
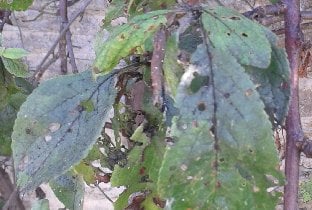
Shot hole damage to leaves
The damage first appears as brown circular marks on the leaves. The brown spots fall out leaving holes.
The copper fungicide Bordeaux Mixture has previously been recommended as a spray to prevent fungal diseases in bay trees. However it has now (or soon will be) withdrawn from sale in the UK. Currently there are no alternatives which have been scientifically proven to be anywhere near as effective as Bordeaux Mixture
Various alternatives are suggested, for example aspirin solution or milk, but none have been proven to have any effect.
The fungus can also be controlled simply by reducing the number of affected leaves and buds. Firstly, remove all fallen leaves and twigs from around the base of the tree. If the area is water logged, try to provide good drainage to reduce humidity. Prune off affected twigs which have infected buds.
Bay tree leaves can occasionally be damaged by leaf cutter bees although they tend to go for other plants first. The damage they do is similar to the vine weevil picture further above this article. But leaf cutter bees are tidy and neat bugs and the holes at the edges of the leaves are very rounded and not ragged.
Also, you should see the bees at work if they are affecting your bay tree. Our advice is to do nothing, the damage is normally minor and they are unlikely to return to the same site next year. If you spray chemicals to kill these bees the spray will also kill other valuable garden insects.
COOKING AND BAY LEAVES
Bay leaves are normally sold in shops and supermarkets in their dried form and they retain most of their flavour for about six months. To retain this flavour store them in an airtight container kept in a cool, dark place.
Freshly picked bay leaves have a slightly stronger flavour and if you have grown them yourself you know exactly what chemicals and preservatives have been used in their cultivation – hopefully none. The flavour and aroma, dried or fresh, provides a background to many soup, meat and sauces recipes. In Europe the main source is from Turkey and they come from the true bay leaf tree Laurus nobilis. In some other parts of the world they use what is known as the Californian bay tree but this is in fact not a bay leaf tree, it is Umbellularia californica.
To dry bay leaves, cut a couple of stems from your plant and hang them by cotton in a warm dry place. They will have dried out after two to three weeks and can then be put in an airtight jar or plastic bag for use whenever required.
DO BAY TREES HAVE FLOWERS?
We are asked this question frequently and the simple answer is yes. The
picture below proves it beyond doubt!
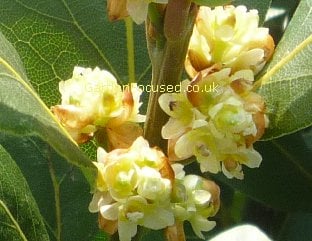
In our experience flowers are produced in April / May time but only on mature specimens. Younger bay trees do not produce flowers. The flowers are very small, about the size of a five pence piece. We don’t remove them because they are unlikely to affect the growth of a mature bay tree.

Flowers on a standard Bay Tree
Click to enlarge picture
Another question we are asked is are there male and female forms of bay trees and if so how do they differ? The answer is that yes, there are male and female forms. The difference becomes apparent in autumn. Female forms will produce berries (and they contain seeds) whereas male forms of bay trees do not generally produce berries.
BAY TREE LEAVES AND WOOD CHIPS AS A MULCH?
Bay tree leaves and the wood is generally regarded as being acidic, they also take a long time to compost down well. For these reasons we use them sparingly on a compost heap or as a mulch. In small doses they are fine but not as a main ingredient for compost or mulch.
Sometimes our readers ask specific questions which are not covered in the main article above. Our
Bay Tree comment / question and answer page
lists their comments, questions and answers. At the end of that page there is also a form for you to submit any new question or comment you have.
Bay Trees in containers
Buying Bay Trees
Caring For Bay Trees
Pruning Bay Trees
Lollipop Bay Trees
Pest and Disease
Bay Leaves in Cooking
Frost Protection
Comments, Questions and Answers
HOW TO CARE FOR BAY TREES
Bay trees in containers can live for 20 years or more if looked after well, in open ground they can easily live for 50 years. So, they are a herb which is well worth taking a bit of care over.